Here are a few fun looking free patterns I've recently come across:
First, a great little amigurumi dragon pattern by Lucy Ravenscar. This photo show it in all one color and the pattern shows it done a little differently with a second color down the back ridge. I'm currently hooked on reading Martin's Fire and Ice series (Game of Thrones) and can see this made up as Drogron, Rhaegal, and Viserion!
Okay - I have to get my knitting skills up to par if only to make this fabulous humpback whale! The pattern is free on Bec Brittain's website.
Every year I buy those fleecy spider webs at the Halloween store and every year I think there has to be something better. Here it is! If you added extra chains around the edges you could hang it up. The pattern is free on Crochetnmore here.
And if you're thinking about Christmas projects, here's a darling reindeer ornament from Tamie Snow at Roxycraft. I'd change the nose to red for Rudolph.
Happy Creating! Deborah
I've been up in the Northwest and having fun looking at the animals, yarn, and fleece at the Oregon Flock and Fiber Show! The last time I went, I got totally overwhelmed ... there was so much to take in. This time, I focused on a couple of types of goats and sheep!
I spun up some pygora roving last spring and couldn't believe how soft it was - so they were one of my first stops. They're darling little goats ....
.... that are very friendly and curious!
I bought quite a bit of off white roving from Mirabelle the pygora goat from Peppermint Pastures.
I've been reading a lot about Icelandic sheep recently and was very happy to find some at the show to look at. They're smaller than I thought - but a nice size! I talked with Laura Roe from Hyalite Farms and she raved over how mellow and easy to raise they are.
Here's the roving I bought from her - a nice white, gray mix that looks like it would also felt nicely.
And I loved the cashmere goats! They're so fluffy and soft - little clouds on legs!
Little c left the show with this great llama finger puppet.
Happy Creating! Deborah
 These quick and easy fall leaves are based on a common way of making leaves for Irish crochet. I started out trying to develop them into a maple leaf - it didn't quite work out, but I think these are great! I'm still working on that maple leaf, though ...
Materials:
*embroidery floss - one skein will make one leaf with a little left over
*size 4 crochet hook
1. Chain 16. In the second chain from the hook, single crochet. Single crochet all the way down to the end. Do not turn around - you'll be going up the opposite side of the chain. Chain 2 and single crochet in the same chain you made your last single crochet in. So now, the last chain should have 1 sc, 2 ch, 1 sc. Continue working single crochet up the opposite side of the chain until you are three chains from the top. Stop here. The remaining chains will form the top point of your leaf.
2. Chain 2. Single crochet in the second chain from the hook and in each single crochet back down in the direction the arrow is pointing, until you get to the chain 2 space. Single crochet in the chain 2 space. Chain 2. Continue single crochet until you are 3 spaces from the top.
3. Your leaf should look like this. Chain 2. Single crochet in the second chain from the hook and in each single crochet back down in the direction the arrow is pointing, until you reach the chain 2 space. Single crochet in the chain 2 space. Continue single crochet until you are 4 spaces from your last leaf point.
4. Now your leaf will look like this. Chain 2. Single crochet in the second chain from the hook and continue single crochets in the direction the arrow is pointing, again stopping at the chain 2 space. Single crochet in the chain 2 space. Continue single crocheting until you are 4 spaces from your last leaf point.
5. This will give you a top leaf point and two lower leaf points on each side. Continue working in the same way until you have 4 lower leaf points on each side. After making your last leaf point, continue single crochet to the chain 2 space. Single crochet in this space.
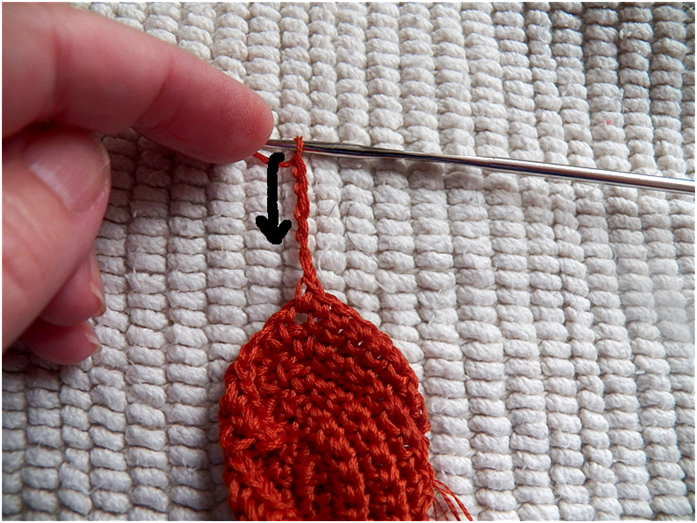
6. To make the stem, chain 6. Single crochet in the second chain from the hook and in the rest of the chains in the direction of the arrow. Single crochet onto the body of the leaf.
7. Slip stitch in the next space. This is the one I've put a black dot on. Fasten thread off.
8. Here is a completed leaf. They roll up a bit - you can steam iron or block them if you'd rather have them be flat.
9. With leftover thread from one of the other leaves you make, sew a running stitch up the center of the leaf for a vein.
I should warn you - these are addictive! I have a small pile already!
Happy Creating! Deborah
These quick and easy fall leaves are based on a common way of making leaves for Irish crochet. I started out trying to develop them into a maple leaf - it didn't quite work out, but I think these are great! I'm still working on that maple leaf, though ...
Materials:
*embroidery floss - one skein will make one leaf with a little left over
*size 4 crochet hook
1. Chain 16. In the second chain from the hook, single crochet. Single crochet all the way down to the end. Do not turn around - you'll be going up the opposite side of the chain. Chain 2 and single crochet in the same chain you made your last single crochet in. So now, the last chain should have 1 sc, 2 ch, 1 sc. Continue working single crochet up the opposite side of the chain until you are three chains from the top. Stop here. The remaining chains will form the top point of your leaf.
2. Chain 2. Single crochet in the second chain from the hook and in each single crochet back down in the direction the arrow is pointing, until you get to the chain 2 space. Single crochet in the chain 2 space. Chain 2. Continue single crochet until you are 3 spaces from the top.
3. Your leaf should look like this. Chain 2. Single crochet in the second chain from the hook and in each single crochet back down in the direction the arrow is pointing, until you reach the chain 2 space. Single crochet in the chain 2 space. Continue single crochet until you are 4 spaces from your last leaf point.
4. Now your leaf will look like this. Chain 2. Single crochet in the second chain from the hook and continue single crochets in the direction the arrow is pointing, again stopping at the chain 2 space. Single crochet in the chain 2 space. Continue single crocheting until you are 4 spaces from your last leaf point.
5. This will give you a top leaf point and two lower leaf points on each side. Continue working in the same way until you have 4 lower leaf points on each side. After making your last leaf point, continue single crochet to the chain 2 space. Single crochet in this space.
6. To make the stem, chain 6. Single crochet in the second chain from the hook and in the rest of the chains in the direction of the arrow. Single crochet onto the body of the leaf.
7. Slip stitch in the next space. This is the one I've put a black dot on. Fasten thread off.
8. Here is a completed leaf. They roll up a bit - you can steam iron or block them if you'd rather have them be flat.
9. With leftover thread from one of the other leaves you make, sew a running stitch up the center of the leaf for a vein.
I should warn you - these are addictive! I have a small pile already!
Happy Creating! Deborah
Autumn is one of my favorite times of the year. I love it when I'm in Phoenix - the mornings and evenings get cooler and the days feel like the best summer day up north! Not really any good leaf color, though. To see more than the little bit we get in November, I have to travel. And lucky for me I have sons in the Northwest and the Northeast - both areas are beautiful in the fall! I took the photo to the left last November in New Hampshire and planned on using it as inspiration for a quilt. Hmmm ... later, I guess!
I did some net searching, though, and found three gorgeous autumn inspired quilts that also might inspire you.
Sally Wright's Autumn Aspen captures one of my favorite fall scenes - brightly colored leaves against the amazing cyan blue autumn sky. Her leaves are thousands of slivers of fabric underneath layers of tulle - read here to find out how she made it and what inspired her. Sally has many more beautiful quilts on her website.
Diane Evans also captures the contrast of sky and colored leaves with Autumn in New York. And her free motion quilting makes me think of those autumn winds that swirl the leaves around! There's beautiful contrast of color and texture in this quilt. Diane talks about her work in her blog.
I have a favorite nature park I love to walk in all year, but especially in autumn. Juanita Sauve's Autumn in Stony Swamp brings me right there - the smells, the falling leaves, the autumn sunlight filtering through the trees! Be sure to look at her website - more beautiful quilts inspired by nature.
Happy Creating and Happy Autumn! Deborah
I've been wanting to make something using pinwheel quilt blocks and finally figured out what I wanted - a table runner for fall!
Materials:
*fat quarters of fall themed fabric in two different colorways (I used a leaf pattern with a black background and a tan background)
*fat quarter of a coordinating plain fabric, I used cream - Fabric A
*1yard each of two coordinating plain fabrics, I used rust (Fabric B) and brown (Fabric C). If you buy bias tape instead of making it, you'll only need a fat quarter of Fabric C.
*fusible felt or quilt batting
Cut the following:
2 1/2 x 4 1/2 inch rectangles - 12 from each of the fall fabric colorways and 24 from fabric A
1 1/2 x 2 1/2 inch squares - 24 from fabric A and 26 fabric B
9 x 2 1/2 inch rectangles - 7 from fabric C
1. See this tutorial on making flying geese (steps 2 and 3). Using one of the colorways of the fall fabric and fabrics A and B, make 4 flying geese. Use a 1/4 inch seam throughout and press each seam to one side after you sew it.
2. Sew a rectangle of fabric A onto the top of each of the flying geese blocks you just made.
3. Sew together as shown below.
4. Sew those two together as shown below to make one pinwheel block.
5. Sew one fabric C rectangle to the left side of the block. Repeat with the rest of that colorway to make 3 blocks. Repeat with the other colorway, without adding a fabric C rectangle.
6. Sew together as shown below. Repeat until you have three colorway blocks.
7. Sew together 2 fabric C rectangles and 1 fabric B square as shown below to make a dividing strip.
8. Sew this dividing strip to the bottom of one of the colorway blocks.
9. Matching seams ...
10. ... sew to another colorway block.
11. Add another dividing strip and then the final colorway block.
12. Cut one piece of fusible felt (or quilt batting) and one piece of fabric B a little larger than your pinwheel top (should be about 20 x 30 inches). Layer the felt in between the top and fabric B, iron to attach fusible felt, and pin to hold in place.
13. Quilt by stitching in the ditch over each seam. See this tutorial for an explanation of this technique (step 10).
15. Add bias tape - I made mine from fabric C. (See this past post for how to make and add bias tape)
Happy Creating! Deborah
Mmmm - the mornings and evenings are starting to cool off and it feels wonderful! Even though our leaves won't turn until around Thanksgiving, it makes me think of fall. I went on an ice dyeing frenzy last weekend and ended up with some gorgeous fall colored fabric! See this past post for a tutorial on ice dyeing.
Procion powdered dyes: Scarlet, Rust Orange, Rust Brown, Golden Yellow, Golden Brown, Forest Green, Chamois, Terracotta, and Peach.
Happy Creating! Deborah
It had been awhile since I spent time searching for felt art, so I decided to do just that yesterday afternoon .... and found some pretty amazing pieces!
Okay - I have quite a few food allergies so most ready made food is out for me. That's probably why I love felt food - especially desserts! Just the cover of this Japanese craft book has me hooked. And these croissants ...... they're all made by needle felting. The book's ISBN is 978-4-529-004415-8 and is titled "Wool Felt Sweets."
A lot of my work is inspired by nature and I love the felted dress designs by Horst Couture. This one is titled Avocado and reminds me of trees in a forest - the really old kind with long, twisted roots. Their website has lots of other designs that are fun to look at!
And while I'm really not sure yet how one would go about making something like this, there may be a cat cave in my cat's future! This one is the creation of the German artist Dornroeschen Filzunikate. She has this cat cave and others for sale on this website.
Happy Creating! Deborah