


In case you're not sure exactly fat quarters are -- they're a quarter of a yard of fabric, but measured in a different way. Let's say you have a yard of 42 inch wide fabric. If you cut off a quarter yard in the usual way, you'd have a long, skinny piece measuring 9 x 42 inches. It's hard to make many things out of a piece that size. With fat quarters, you divide the fabric as shown below, so you end up with an 18 x 22 inch piece.

I'm playing around with free motion quilting lately - it's not really hard, but takes a different frame of sewing mind! The five projects I have today all use quilting - next week I'll have more quilted projects and will also show you what I know about using free motion to quilt them.
The line up today is round coasters, headbands, luggage handle covers, wine bottle caddies, and potholders!
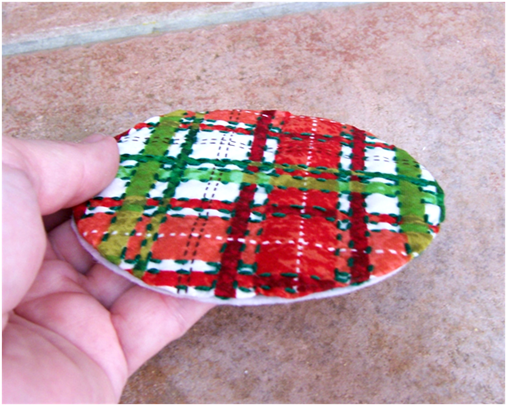
Round Coasters
1. Using the small circle from the patterns here, cut 2 pieces of batting, 2 pieces of felt, and one piece of Steam-A-Seam 2. Cut 1 piece of fabric, using the large circle pattern.

2. Sew around the outside of the fabric circle using a running stitch.

3. Gently pull thread to gather the circle just slightly to make a shallow "cup." Into the cup, place the two pieces of batting and then one of the pieces of felt.

4. Pull the thread more tightly to gather the edge of the fabric over the pieces inside.

5. Quilt the top. I hand quilted along the "ribbon" lines.

6. Take one paper cover off of the circle of Steam A Seam 2 and stick to the bottom. Remove the other paper cover and place the remaining felt circle on it. Iron into place.

7. Sew the edges together using a blanket stitch (if you're unfamiliar with this process, see this past blog post here).

Headband
1. Cut two headbands from fabric, using the pattern here. Place on a fold and add 1/4 inch to each side. Cut one piece of fusible fleece. This is available at fabric stores - Pellon makes a good one.

2. Iron fusible fleece onto the wrong side of one fabric piece.

3. Pin wrong sides of fabric together and sew along the two sides using a 1/4 inch seam allowance.

4. Turn right side out - this can be a little tough, use a pencil and a pair of tweezers to help. Turn the edges of the two openings under 1/4 inch and iron.

5. Iron and quilt. I used a free motion random machine quilting.

6. Cut a two inch piece of 1/2 inch elastic. Insert one end into one opening and sew into place. Insert the other end into the other opening and sew into place.


7. Leave the two ends unsewn - if you sew them together, the headband won't stretch when you put it on.


Luggage Handle Covers
1. Cut two 6 1/2" x 5" pieces of fabric and one 6" x 4 1/2 " piece of fusible fleece.

2. Fuse fleece to the wrong side of one piece of fabric.

3. Pin together three sides and sew a 1/4 inch seam.

4. Turn right side out, fold open edges under 1/4 inch and iron. Sew very close to all edges.

5. Quilt. Cut one piece of fusible velcro to fit on the shorter side. Fuse the soft part to one end of the top and the rough part to the opposite side of the bottom.


Wine Caddy
1. Cut one 12" x 13" piece of fabric, two 13" x 2 1/2 " pieces, one piece of 11 1/2" x 11 1/2" fusible fleece, and one piece of 12" x 2" fusible fleece.

2. Fuse the larger piece of fleece to the wrong side of the larger piece of fabric and the other piece to the wrong side of one of the handle pieces.

3. Pin wrong sides of the handle pieces together and sew both long sides with a 1/4 inch seam.

4. Turn handle right side out. Quilt handle and bag. I used a flower and leaf free motion design.

5. Fold large piece in half and sew the long side and one of the shorter sides using 1/4 inch seams.

6. Make a line 1 inch from the point of each corner. Sew and trim.

7. Turn ends of handle under 1/4 inch and press. Pin handle ends into bag, overlapping about 1/2 inch. Sew in place and go over the sewing a second time.


Potholder
1. Cut two pieces of 10 inch square fabric, one piece of 6" x 1" fabric, and two pieces of 9 1/2 inch square fusible fleece.

2. Iron a piece of fleece to each of the squares of fabric.

3. Pin three sides of the potholder together and sew in a 1/4 inch seam. Fold smaller piece in half and sew the two sides.

4. Turn potholder right side out, turn ends in 1/4 inch and press. Turn smaller piece right side out, fold in half and pin into one corner as a loop to hang the potholder up by. Sew on top close to each edge.


Yum - chicken for dinner!
Happy Creating! Deborah
Wow, these are fabulous! So many great ideas. Thanks tons, I'll be linking.
ReplyDeleteOuah nice simple ideas for debutant.
ReplyDeleteLove the idea of the Luggage Hand Cover! Would make it easy to spot your bag.
ReplyDeleteVery cute! I especially love the luggage handle covers--so much nicer than the colored ribbon I tie on the handle!
ReplyDeleteI wouldn't use that pot holder without Insul Brite used inside instead of fusible fleece.
ReplyDeleteI have several I use with the fusible fleece,but if you have extra sensitive fingers you might want to use something with more of an insulating factor.
ReplyDeleteI saw your tuto ages ago but only did the luggage thingy 2 weeks ago (no quilting). For my daugther's luggage. It works great to add that personal touch and find the luggage.
ReplyDeleteThe quilting on these tutorials is incredible. Do you do this free-hand or do you program your sewing machine to do it?
ReplyDeleteMuy Buena Idea. Feliz y Prospero Año Nuevo 2012, desde Venezuela, con Gran Cariño
ReplyDeletewilperez38@gmail.com
No, I don't have a programmable machine, I just free hand it. It's sort of like doodling - very relaxing!
ReplyDeleteI just got a new sewing machine for Christmas and had been looking at fat quarters but really did not want to make a quilt yet as I have not sewn for many years now I have great projects to get me started.
ReplyDeleteI agree with the potholder comments about insulbrite and on the wine bags I would open up the seams, lay flat and then sew the 1" across.
ReplyDeleteWhat a wonderful set of tutorials! Thank you for sharing.
ReplyDeletePlease tell me how do you get the two ends of the headband to stay together if you don't sew the elastic pieces together? I can't quite figure this out. Please help because I would love to have these for the summer.
ReplyDeleteAfter you get finished with Step 4, each end of the headband will have an opening. Cut one piece of elastic (make it 2 inches long)and put one of the elastic ends into one of the headband openings - sew in place. Put the other elastic end into the other headband opening - sew in place. The one piece of elastic gave enough stretch to nicely keep the band on my head. I hope this helps!
DeleteDuh! I get it now! Thanks.
DeleteGinny
No problem!!
DeleteI use InsulBrite when I make the wine bags. It keeps the wine at a great temperature when I take them as housewarming gifts.
ReplyDeleteThanks for sharing, the luggage tags are a great gift idea!!! Just made some to give for xmas!
ReplyDeleteAwesome, thanks for sharing. I am currently having a Fat Quarter Giveaway for my Etsy shop and I am going to share your free tutorial in my blog and facebook pages so that those who enter will check out your blog and hopefully make some of the items you have shared. My giveaway is here http://www.rafflecopter.com/rafl/display/b02a031/ and my Facebook page is here www.facebook.com/shop/embellishbyandrea Again, thank you!!
ReplyDelete