

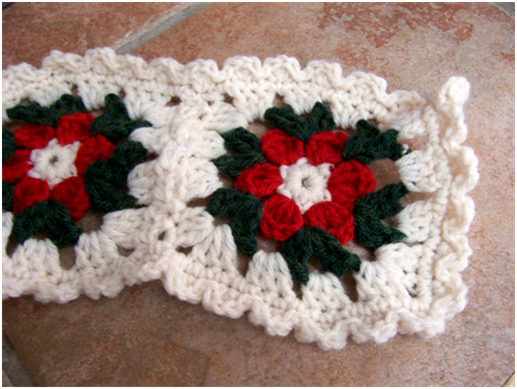
Two weeks ago I posted about several projects I was working on - remember the poinsettia scarf with huge squares? After trying several different hook sizes, I decided what I really didn't like about it was how thick the squares were. It's very 3-D - which would be great for a potholder or pillow, maybe an afghan. But I like scarfs I can twist, fold, and wrap around me! And I was now hooked on the idea of having a poinsettia scarf for Christmas. Hmmm. I've worked with granny squares enough, so I decided to design my own.
Materials List:
*1 skein each of Lion Brand Wool-Ease (or any worsted weight yarn) in Ranch Red (A) and Forest Green Heather (B)
*2 skeins Lion Brand Wool-Ease in Fisherman (C)
*Size H crochet hook (there really isn't a gauge for this pattern, so use a hook that gives you the size of square you want)
Lion Brand yarns has a great set of videos on learning to crochet. They don't have any on granny squares, though, so I've inserted a couple of short ones showing you how to get started on a granny square and how I hook the squares together.
1. With C, chain 4 and join into a ring.
2. Chain 1 and single crochet 12 times into the ring made. Join to the first single crochet with a slip stitch. Fasten off the yarn.

3. Join A. Chain 3. In the first sc, complete 1 double crochet, 1 triple crochet, and 2 double crochet. Chain 1. Skip one sc from the previous row. In the next sc (2 dc, 1 trc, 2 dc) - a petal. Chain 1, skip the next sc from the previous row and repeat a petal. Repeat this pattern around the ring until you have 6 petals. Join to the top of the first petal with a slip stitch and fasten off A.

4. Join B into one of the ch1 spaces from the previous row. Chain 3, complete 1 dc, 3 ch, 2 dc. Chain 3 and in the next ch1 space (2 dc, 3 ch, 2 dc) - a leaf. Chain 3 and repeat leaves until you have six. Join to top of first leaf with a slip stitch and fasten off B.

5. Join C into one of the ch3 spaces between leaves. Chain 3, 2 dc in same space. Chain 1 and in the next chain ,space, (3dc, 3ch, 3dc) - a corner. Chain 1, 3dc in next chain space, ch1, 3dc in next chain space, ch1. In the next chain space, make a corner. Repeat around until you have completed the square. Join to the top of your first ch3 with a slip stitch and fasten off C.

6. Make 14 squares.
7. To join the squares, using C, you can sew them together or hook them together. To hook these squares together, I put two squares end to end and join C into the right top corner of the bottom square (in the chain space). Slip stitch into the chain space of the square above it. Chain 1.

Slip stitch into the next middle dc of the square below. Chain 1. Slip stitch into the next middle dc of the square above. Chain 1. Slip stitch into the next chain space of the square below. Chain 1. Slip stitch into the next chain space of the square above. Chain 1.

Continue in this way across, ending with a slip stitch in the left corner of the square above. Fasten off yarn.

This way of attaching does make a pattern, so decide if you want to attach the squares with the right sides facing you or the wrong sides facing you.
I attach two squares first and then add them to the scarf - it's just less bulky for me to work that way, but whatever works for you, go for it!
8. To make an edging, attach C to a corner space of one of the end squares. Chain 1 and make 1sc. Make 1 sc in each dc on the scarf, 2 dc in each corner you come to, and 1 sc in each of the places you joined squares. Continue down the length of the scarf. When you get to the end of the length, 3 sc in the corner. Continue in this way until you are back to where you started. Join to the first sc with a slip stitch.
Chain 4, 1 dc in first sc from row below. Slip stitch in the next two sc of row below. *(1 dc, 1 chain, 1 dc) in next sc of row below, slip stitch in the next 2 sc of row below. Repeat from * until you get back to where you began. Join to first dc with a slip stitch and fasten off.

Happy Creating! Deborah
I love your pointsettia scarf! Thanks for sharing the pattern, these granny squares would also make a great Christmas tree skirt or snuggly Christmas blanket.
ReplyDeleteHi, this is Jess from Lion Brand. Thanks for your compliment on our learn to crochet videos! I think your scarf looks great, and you did a fantastic job writing the tutorial. Keep up the great work!
ReplyDeleteWith warm regards,
Jess H.
Lion Brand Yarn
I am so *not* a scarf person - but this one I absolutely have to make! Thanks so much! Yes, as Wendy said the squares can be used for so much more. I'm in the process of making sort of a crazy quilt afghan with different squares picked up here and there. I am sure this one will fit in it, too.
ReplyDeleteThis is AWESOME!! Thanks! I am already making one... I plan to make myself one, one for the girl we mentor and one for my mom. They will make wonderful Christmas gifts! I might even make one for my sister if I can get it done in time! :)
ReplyDeletelove it love it! thinking of doing this in thread for christmas ornaments on a white disk, in addition to the scarf in a lighter weight yarn. also really like the holiday sparkle scarf and flower face cloths. we are really into making facecloths, dishcloths, etc as part of our "survival" kit thanks so much. i am sure we will revisit your site and perhaps someday contribute. karenb/fredw
ReplyDelete