

Hmmm - or is it a quilted cat nap mat??!! That's Marley snoozing away.
I used to practice yoga - too many years ago to remember what I'm doing, though - and recently decided I should start again. Back in the old days, I used a towel to lay on. It was a pain, it wrinkled and slipped all over, but everyone else used a towel too and no one was complaining. Now, there are plastic and foam mats, which I really don't like - so I decided to make a quilted, washable one1I.

*4 yards cotton fabric in a plain color (unless you like to stare at wild patterns while holding yoga poses)
*11 yards coordinating bias tape
*hi-loft quilt batting
*2 yards non-slip fabric (this is the fabric used on the bottom of footie jammie feet - found at fabric stores)
*fabric glue - I like Aleene's Jewel It for durability in the wash
1. Cut fabric into two 2 yard by 1 yard pieces. I wanted my edges to be rounded - to do this, I fold the fabric into quarters and use a plate to draw a curve on the open edges with a piece of chalk. Cut along the chalk line.

2. Sandwich quilt batting in between the two pieces of fabric and pin. If you are new to basic quilting, see this post here for how to do this and also how to do basic machine quilting.

3. I used my walking foot attachment and a line guide to do simple straight line quilting.

4. Attach bias tape to finish the edges. See this post for more information on making and using bias tape.
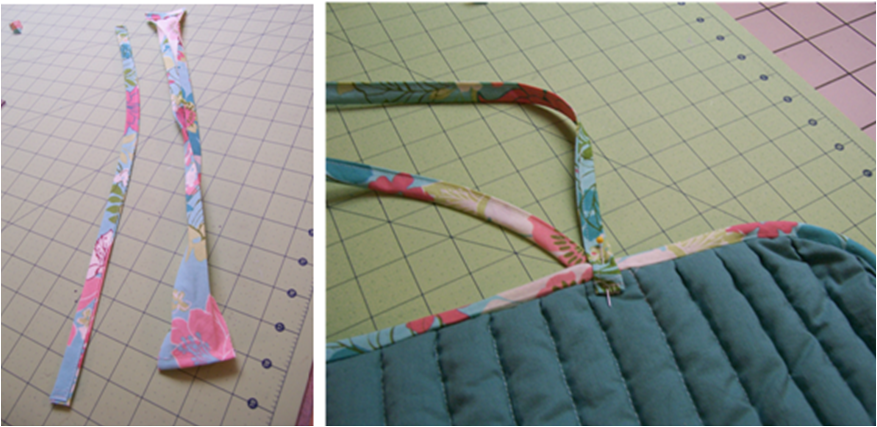
5. Cut 4 18 inch pieces of bias tape. Turn the short edges under about 1/4 inch and sew. Refold bias tape and sew along the open edges. Pin two pieces of sewn bias tape 6 inch in from each edge of one end of the mat, putting one piece on each side. Sew into place.
6. If you'll be using the mat on a slick floor (about anything except carpet), you'll need non-slip decals put on the back. I cut out flower shapes from non-slip fabric ...

and glued them on with fabric glue. With the quilting, the edges stuck up a little more than I would have liked them to, but I'm going to wait until I wash the mat and see if I need to finish the edges or not. I don't really want to sew them and have the sewing show through on the other side of the mat - I'm thinking of maybe tracing around the edges with puffy paint. We'll see!

7. To easily carry the mat, roll up from the end that does not have ties, put one tie in front of the roll and one in back, and tie in a loose bow.

Happy Creating! Deborah
Very cool! Thank you!
ReplyDeleteThank You! I have been searching for this. This is the only pattern I could find1 Thanks!
ReplyDeleteI would've sewn the non stick parts onto one of the pieces of fabric and then finished the quilt like you did. The non stick parts would have the lines and stuff, but they would probably stay better and look more polished.
ReplyDeleteThis comment has been removed by the author.
DeleteIs there a reason you just didn't use the jammie foot nonslip fabric for the whole backing? Thanks,
ReplyDeleteYes - you could do that. I didn't like the way it looked when I quilted a test piece, but it would definitely keep it from slipping!
DeleteDon't your feet slip around on the fabric? I like my sticky mat so that my feet don't slide.
ReplyDeleteNo, my feet stay put, but then I'm a beginner and don't do anything very complicated!
DeleteThanks, I loved the tutorial, Yoga saved me from being an invalid, literaly I was shopping for a wheelchair. I’m glad to see people interested and your tutorial made me realize I need to improve my mat, thanks!
ReplyDeleteThis is really great and I love the fact that the size is customizable to accommodate all different peoples needs. Thanks for sharing!
ReplyDeleteJanet here - I wonder if doing a satin embroidery or a button-hole type stitch around the flowers would work so that it would be attractive on both sides??? Anyway, this is very cute! Thanks for sharing!
ReplyDeleteIt'll work just great - in fact, I did just that awhile ago as I found the flowers were not staying on very well! I've been planning an update and should have it up soon.
DeleteI was wondering your finished dimensions? Thanks for your time,
ReplyDeleteAmy
It's about 32 by 68 inches. No problem!
DeleteI found this on Pinterist and I'm so glad I did. I'm using this tutorial to make mats for my kids. I love how they look and each kid has their own color. Plus its much cheaper to make these than go out and buy a bunch of mats for my 4 kids.
ReplyDeleteI was just wanting a mat to do some exercises and stretches but have hardwood flooring everywhere so this is perfect! Thanks!!!
ReplyDeleteI'd hand stitch the edges with a hidden stitch
ReplyDeleteI don't like working with bias tape. Is there a reason that you aren't sewing right sides together with batting on top, turning it, quilting it and then top stitching around the edge? What does the bias tape add? Thank you! I don't want to do it the way outlined above only to find it doesn't work. :)
ReplyDeleteYeah, I think bias tape is a love it or leave it type of thing! I fold over and hand stitch bias tape rather than top stitching just as a personal preference. Either way works, though!
Delete