

I am probably one of the messiest cooks, dyers, crafters, artists, .... name an activity and I'm sure I'm among the messiest! I have an art apron I use when I dye, but it's a little on the thin side and direct hits with splashes often leak through. So I decided I need something heavier - and that would also work for gardening. And pockets would be nice! Actually, I've been mulling around what would work for a couple of months now and didn't think of repurposing old jeans for an apron until a few days ago. I found a couple of cute small denim aprons on different blogs, but I need a bib extension to save my shirts. This works perfectly!

Materials:
*old pair of jeans - larger than your usual size works best for full coverage. I used a pair of my husband's.
The only other things you need are a sewing machine, thread, scissors, a ruler, and pins!
1. I'll give you the measurements for cutting I used and will also tell you how I got those measurements. I'm short - I strongly suggest measuring yourself so you have an apron that fits!
Determine how long you want your apron to be - how far down your legs it will go. Measure from your waist to this point. I got 15 inches. I added 1 inch for a hem and got 16 inches. Lay your jeans out on a flat surface with the backside up, measure 16 inches down the leg and mark. Do this in several places - lay a straightedge along these marks and draw a straight line.

2. Cut along the line you drew through the back of the jeans only (the side facing you). You'll need the front to be longer for the ties.
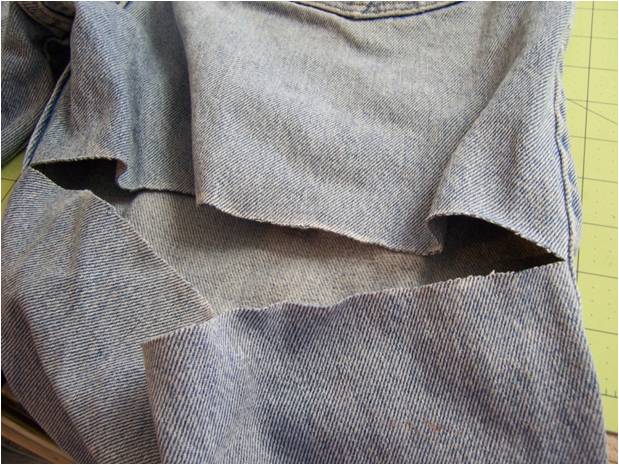
3. Cut along the outside of each outer leg seam. When you get to the waistband, cut a 1 inch extension tab as shown below. I realized I took photos of two different legs - the photo on the left showing you where to cut along the seam is the leg on your left side, so that extension will point to your left. The photo on your right shows how the extension will look when you cut the leg to your right. If this sounds confusing, look down a couple of photos to see what it will look like.

4. Now your apron piece will only be attached to the rest of the jeans by the inner seams. Cut along the outside of that seam to free it.

5. This is what you should have at this point:

6. Cut the inseam (the crotch seam) off entirely.

7. Cut up each side of the center seam a couple of inches and cut it out.

8. Fold your left side under about 1/4 inch, fold over your right side and pin in place. Sew about 1/8 inch in from the edge.

9. Put a straight edge along the bottom, draw a line, and trim so the bottom edge is straight.

10. Fold the bottom edge under about 1/2 inch and sew about 1/4 inch in to form a hem. If your machine has trouble sewing through really thick seams, you need to cut a half inch out of each side seam before you pin the bottom up. Tada! Your apron front is done!

11. To measure the bib portion, measure from your waist up your chest to the height you want your bib to reach. Add 1 inch. I wanted mine to be 12 inches so I added one inch to get 13 inches. Measuring from the bottom hem up, cut one leg 13 inches long. Open up by cutting on the outside of the outside leg seam.

12. This will give you one side without a seam and one side with a bulky seam. Cut the bulky seam off.

13. Open up your rectangular piece. Zigzag stitch along the bottom (non hemmed) edge. Fold each side under about 1/4 inch and sew close to the edge. If your machine has trouble with bulky seams, you'll need to cut in 1/4 inch at the original jeans hem, fold the side under, and then cut that little 1/4 inch extension off. Zigzag the rough edge, where I'm pointing.

14. Turn the apron portion over so the right side is down. Lay the right side of the bib on top of the apron, overlapping about 1 inch. Pin, then check to make sure it fits how you want it to.

15. Sew on the front, following the top sewing line already on the waistband (from when they were jeans!).

16. Now you need to make the top of the bib narrower so it fits better. Hold your apron up and mark where you want the outer edge of the bib to come. I marked 3 1/2 inches in from the edge. Put one end of a straight edge on your mark and the other edge at the edge of the apron piece (not the extension tab). Draw a line.

17. Fold along the line you drew and pin in place. Make sure you leave the extension tab sticking out.

18. Sew about 1/4 inch in from the edge. This is going to leave you with a flap of fabric on the inside. It doesn't bother me - in fact I think it gives the bib a bit more stability. But if it bothers you, cut if off.

19. Cut the inseam (inner leg) seam off of the remaining jeans leg. This will be the neck strap.

20. Pin one end of the neck strap about 2 inches down inside one of the bib flaps. Try it on and determine how long you want your neck strap to be - it needs to be short enough to hold up the bib, but still be long enough to allow your head to go through. I made mine 21 inches - included in this measurement is 4 inches so I could put each side of the neck strap 2 inches down inside the bib flaps. Pin the other side in place and sew - go back and forth a few times to get it securely on.

21. From the remaining jeans leg, cut two 26 by 2 inch pieces for the ties. I'm about average size for roundness - if you're thin you'll need shorter ties, if you're rounder you'll need longer ties. Fold under 1/4 inch on one short end and sew. Fold under 1/4 inch on each of the long ends and sew. Put the right side of a tie (unhemmed short end) to the right side of an extension tab and sew even with the edge of the apron.

22. Place apron tie going out from the apron as shown below. Trim the extension tab down near the sewing, fold the seam on the tie side toward the apron, and sew in place.

23. And you're done!! There are pockets to stick stuff in and even belt loops to hang stuff off of!

Happy Creating! Deborah
This is the best 'repurpose jeans' project I have seen in a VERY long time. Nice. Thanks so much for sharing.
ReplyDeleteHi Deborah-
ReplyDeleteOMGosh - love this project. I am always looking for creative things to do with my old jeans - This is so cute and handy also. Now I just have to figure out what pair of old jeans I am going to make one from - dark or faded? Wonderful tutorial, too.
My best- Diane
I found you through Rachel at One Pretty Thing - love her site as I find so many good sites I probably would never find on my own.
It's staggering idea! I linked your tutorial in our blog www.craftreport.blogspot.com . Thanks!
ReplyDeleteBrilliant!!! I linked to your tutorial over at Craft Gossip Sewing:
ReplyDeletehttp://sewing.craftgossip.com/tutorial-recycled-jeans-bib-apron/2011/05/08/
--Anne
How Cool is this! I really love this. great TUTE!!!!! Thank you!.
ReplyDeleteI am a newbie learning and this is perfect!!!!!!!!!!!!!!.
http://openbeauty.blogspot.com/
What an Awesome apron you made. Good job.
ReplyDeleteEs el reciclado de vaqueros mas interesante que encontré.Gran trabajo!
ReplyDeleteTodos los delantales me gustaron.
Cariños.
Thank you!
ReplyDeleteI DONT UNDERSTAND HOW WE GET A COPY OF THE DIRECTIONS. PLEASE HELP, YVONNE
ReplyDeleteMargaret - the only instructions for the apron are those above with the photos. Deborah
Deleteje suis debutante en couture pourrais je avoir les explications en Français merci
ReplyDeleteJe suis désolé, je ne parle pas français et ne semblent pas avoir un paramètre de traduire automatiquement au français sur blogger. Toutefois, je pense que ce site peut vous aider à : https://translate.google.com/
Delete