Friday, September 30, 2011

Friday Inspiration - Screen Printed Textiles


Clare Verstegen, Overhead, 2006.  Industrial wood felt, pigments, wood, transfers

I'm having a blast with my Printed Textiles class!  I'm working on my second assignment and have more of an idea of where I'm going than I did with the first one.  I'm really interested in how I can use screen printed fabrics in quilting, so I thought that today I'd show you some things artists are doing with the medium.

The professor for the class is Clare Verstegen, an artist known in the field for her screen printed fabrics.  She uses texture layering amazingly!  You can see more of her work here and here.


Jessica Polzin , Quaint Little Quails


Quail are commonplace in the metro Phoenix area - you love them or tolerate them depending on how annoyingly they stake out your garden.  Jessica Polzin's piece uses quilted and pieced screen printing with some wonderful quail.  I haven't started cutting apart and piecing my pieces, but feel like that's going to be something I need to try.  See other of her works here


Yvonne Brown, Purple Pavement, hand-dyed and screen printed fabrics.


This piece by UK artist Yvonne Brown combines screen printing with layered fabrics, beading, and embroidery and has given me several ideas on the direction my pieces could take.  I really like the non-linear edges on this piece.  See more of her work here.


If you're interested in screen printing, stay tuned for more information on tutorials to get you started.  In the meantime, this Wikipedia article gives you information on the medium.

Happy Creating!  Deborah

Wednesday, September 28, 2011

Wednesday Sewing - Screen Printed Quilt

Even though I'm working on my Masters degree in Art Education, I'm also taking a studio fiber arts class in screen printing on fabric this semester.  I love it!  I'm working out the plans to make my own printing table and will definitely share it with you when it's made.  I'll also have tutorials on different types of screen printing you can do on fabric at some point.  Until then, I'll show you what I'm working on for the class.

I just finished my first project - fabric screen printed with plastic stencils.  This is my fabric when I was done printing ...


I have a hard time just leaving something as it is!  It seemed like adding another layer of texture would really be nice on this piece, so I echoed some of the shapes I'd printed with thread sketching and also added a thread border.  I had already decided this would be a small quilt, so I dyed some of the fabric blue to back it with and did the thread sketching through all three layers so it would be quilted.  A matching bias tape binding and I was done!  The lighting where I took this photo wasn't very good - the photo above is more true to the correct coloring.


Here are some close ups of the front -


and one of the back.


Now we're on to registered repeat designs - I have NO idea how this one will turn out!  We'll see ....

Happy Creating!  Deborah

Monday, September 26, 2011

Monday Project - Felt Grapes


As you can hopefully tell by the opening photo, this week I added a bunch of grapes to my felt food project.  And my basket is filling up!   If you're new to this project see week 1 here and week 2 here

Materials:
*felt - purple or green (depending on what color of grapes you want to make), green, and brown
*embroidery thread - purple, green, and brown
*fiber fill
*patterns found here

1.  Using the patterns, cut 18 grape circles, 4 leaves, and one 1-inch by 3-inch rectangle of brown.  With thread that matches or comes close to the felt you're using for the grapes, sew around the outside of the grape circles using large stitches.  Pull up on the stitches to make a cup shape.


2.  Stuff cup with fiber fill, sew across one side of the opening, turn the grape and sew across the other side.


3.  Repeat with another grape circle.  After you've finished step 2 with the new grape, attach it to the first grape.


4.  Continue until you have five grapes attached in a ring.  Make another grape and add it to the center of the circle, attaching it to all the grapes in the ring.


5.  With the grapes in your first ring facing the way shown in the photo above, continue making grapes and attaching them to the first ring.  Starting with the second ring, attach your grapes so the gathered opening faces up and is hidden by the previous ring.

Second ring - five grapes.  Offset them from the first ring by attaching them in the space where two grapes from the first ring meet.

Third ring - four grapes.

Fourth ring - three grapes.

Fifth ring - one grape added to the center of the three grapes in ring four.


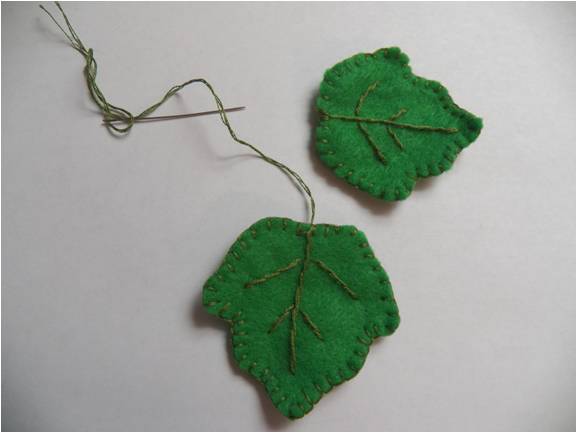
6.  Put two leaves together and join with a blanket stitch.  Embroider veins using an outline stitch.  Repeat with the other leaf.


7.  Attach the two to the top of the grape cluster.


8.  Take the brown rectangle and roll it up tightly.  Secure the loose edge with a few stitches.  Attach between the two leaves.


And you have a bunch of grapes!  And I'm already thinking about what my next food will be ...


Happy Creating!  Deborah


Friday, September 23, 2011

Friday Inspiration - Monica Kinner Whalen's Prairies

Barley Field
While looking for thread sketching inspiration, I came across the work of Saskatchewan artist Monika Kinner Whalen.  Monika works with fabric and thread to create gorgeous fabric art of the northern prairies.

My husband grew up on a northern Montana wheat farm and even though he left after college, we returned often while his parents were both with us.  If you just see photographs of northern prairies, you might think they're pretty plain looking - grain fields, dirt, sage brush, and mountains in the distance.  They're actually quite packed with plant life, it's just most of it is fairly small and delicate.  I think that's one of the things that works bests in Monika's thread sketched prairie art.  It has a real feel of prairies, with the single thread she uses.

Autumn Prairie Fire
 I love the way she uses so many hues of colors - the barley field is not just tan, but at least four or five different colors, by my count.  When viewed on the smaller reproductions here, that gives the feel of a real grain field.  Click on the photo for an enlargement on her website and you'll see just how many different colors there are - just like with the a field.

Much of her work is small - post card sized, which makes it all the more amazing that she is able to get so much detail in.  Notice that she doesn't just use a straight stitch for sketching.  I'm going to have to try adding a small zigzag to my practice pieces!

Homestead on Highway 7


Monika's website has a gallery of her work, a link to her Flickr photostream with more work, and also a blog, where she sometimes shows her work in progress - a great way to pick up new techniques.  Be sure to take a look at it!

Happy Creating!  Deborah


Wednesday, September 21, 2011

Wednesday Sewing - More North Star Quilted Potholders

Remember the 4th of July themed North Star quilted potholders?  My mom's been busy!  She made these two variations on the pattern that I'm hoping will inspire you.

Mom found this great fabric in Southwest themed colors a few months ago while we were shopping.  As someone who has a way, way too big fabric stash, I felt a little guilty encouraging her to go ahead and buy it, even though she didn't know what she'd do with it ... we all know where that leads!  But I felt totally vindicated when I saw her potholders.


We also worked together making the Christmas North Star table runners and with the extra pieces, she made these potholders.


So get out your scrap fabric and see what you can come up with!

Happy Creating!  Deborah


Monday, September 19, 2011

Monday Project - Felt Carrots/Feather Stitch


This week I've added carrots to my felt food project.

Materials:
*orange and green felt
*orange, light green, and rust embroidery thread
*fiberfill stuffing
*patterns found here

1.  Using the patterns, for each carrot cut 2 of carrot 1, 2 of carrot 2, and 8 of the leaf.  Sew carrot 1 pieces together on the wavy edge using a narrow seam.  Sew carrot 2 pieces together on the wavy edge using a narrow seam.  Join the two pieces together sewing along the straight edges.  Turn right side out.


2.  Stuff with fiberfill.  Using 2 strands of orange thread, baste around the top.  Pull thread tight, closing opening.  Sew across the opening.


3.  Sew leaves by putting two pieces together and joining with a blanket stitch, using 3 strands of light green thread.


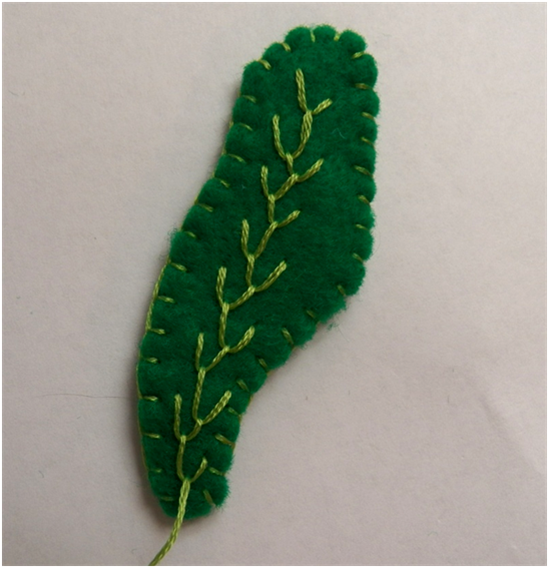
4.  Embroider down each leaf with a feather stitch.  Bring needle up at the top of the leaf.


5.    Hold thread down on leaf.  Insert needle down to the right of it and bring up next to the thread.  Pull needle through.


6.  Hold thread down.  Insert needle down to the left of it and bring up next to thread.  Pull needle through.


7.  Repeat, alternating bringing the needle up on the left and right sides, until you have reached the bottom of the leaf.


8. Without tying off thread, sew leaf to top of carrot with several stitches. 


9.  Repeat with all four leaves.  With 3 strands of rust embroidery thread, sew lines in the carrot body using an outline stitch and single stitches.  Pull stitches tightly to give a slightly puckered look.


Happy Creating!  Deborah


Friday, September 16, 2011

Friday Inspiration - SAQA's 2011 Benefit Auction

Fall's Fruit, Lauretta Crites


The SAQA (Studio Art Quilt Associates) 2011 Benefit Auction is up on their website, ready for buying, bidding, or just being inspired by.  I look forward to looking at all the art quilts each year to see what new techniques people are using.  I chose to give you a little preview.  Click on the photos to see all of the detail.
Rolls of Gold, Rebecca Douglas


There are 6 pages, so grab a cup of something good to drink and have fun!

Apricot in Color, Michelle Jackson


Happy Creating!  Deborah


Wednesday, September 14, 2011

Wednesday Sewing - Thread Sketching

 Off and on over the last couple of years, I've tried to get the knack of "thread sketching" - using your sewing machine to draw on fabric.  It's just never looked like I wanted it to.  I had a break through!  It was the thread size - anything I'd read said to use thicker thread, so I went up from 40 to 30.  The lower the number on thread, the thicker it is.  So I'm working on an assignment for the fibers class I'm taking this semester and really, really wanted to do some thread sketching on it.  I went to my local quilting shop and found Sulky 12 weight thread - wow is it thick and wow does it ever look just like I always wanted my thread sketching to look!!

I'm in the practicing stage and strongly suggest lots of practice if this is something you've been wanting to learn how to do.

Make a rough sketch of something simple on a doubled over piece of scrap cloth - thread sketching is much easier to do on a doubled piece of fabric or a quilt sandwich.  I used my favorite coffee cup.


Put on your darning or free motion quilting foot and drop the feed dogs.  This past post has more information on free motion quilting and how to get set up for it.  Use a size 14 or 16 quilting needle.


Begin sewing!  I have found it's easiest if you put your speed a little faster than you may be used to free motion quilting.  Go over each line several times to give it that "sketched" look.


I'll show you what I've been working on when I get it done.

Happy Creating!  Deborah


Monday, September 12, 2011

Monday Project - Felt Strawberries


I have a surprise project started!  Little c is coming down to Phoenix for Thanksgiving and I'm working on something for her to play with that involves making quite a bit of felt food.  I can't tell you what it is yet since her mom and dad read the blog, but I can give you the tutorials for the food as I get it designed.  This weekend I made strawberries.

Materials:
*red and green felt
*red, green, and light tan embroidery thread
*fiberfill stuffing
*patterns found here

1.  Using the patterns, for each strawberry cut out four strawberry pieces and two stem leaf parts.


2.  Using 6 strands of light tan embroidery thread, make short stitches on each of the strawberry sections to represent seeds.


3.  With right sides together, sew two pieces of strawberry in a very narrow seam along one side. 


4.  Repeat until all pieces have been sewn together.  Turn right side out and stuff with the fiberfill.


5.  With two strands of red thread, sew large stitches in a circle around the top.  Pull thread tightly to close the top opening and tie off.


6.  Put the two stem leaf parts together and sew edges together in a blanket stitch, using two strands of green embroidery thread.


7.  Attach the stem leaf piece to the top of the strawberry with one stitch.  Stitch the point of each leaf to the strawberry to tack down.


8.  Tada!  A cute little strawberry!  While I was making the third berry, one of the cats stole the first two and I got to go on a strawberry hunt - apparently roundish felt things are also always toys.  Hmmm ...


Happy Creating!  Deborah