
Today, we're going to learn how to use a blanket stitch to attach appliques, or pieces of fabric, to other pieces of fabric, such as jeans, jackets, or backpacks.
Learning the Blanket Stitch:
Materials List:
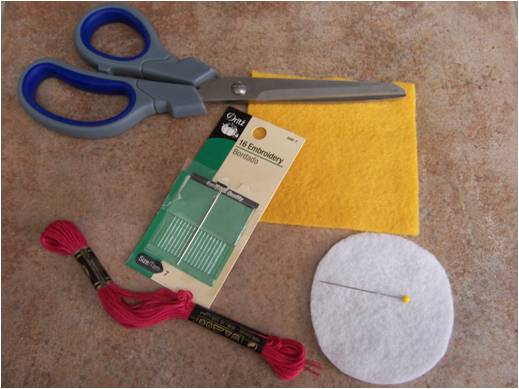
*Two pieces of felt for practice - felt is easy to learn on, but any two pieces of heavier material will work.
*Embroidery thread
*Size7 embroidery needle
*Sewing pins
*Sharp scissors
*Optional: Disappearing ink pen (in the quilting section of fabric stores)
1. Cut two shapes from felt - one smaller than the other. Exact size doesn't matter, but you can copy the pieces I made.
2. Sometimes it's easier to learn embroidery stitches when you draw small dots to show where you will be stitching. I've done that on my top circle, making small dots about 1/8 inch in from the edge and about 1/4 inch apart.
3. Pin the smaller piece on top of the larger piece.

4. Thread your needle with about 2 feet of embroidery thread, using all 6 strands. Generally when embroidering, you want to use the smallest needle you can get the thread through, so you don't leave large holes in your fabric. I like to use a big, strong needle, however, when I'm putting appliques on heavy fabrics like denim.
Knot the end of your thread. In embroidery, you almost never want to knot the back - it pops out and looks bad. This is one case where a knot will be useful, since it won't come through the denim.
5. Insert your needle through the back of the lower felt coming up next to your upper circle directly above one of your dots.

6. Insert your needle into the upper circle through the dot below where you first came up and bring the needle up through your first hole. Make sure your needle comes over the TOP of the thread you left laying horizontally.

7. Gently pull the thread through. Insert needle in next dot and out through bottom piece directly above the dot, as close to the upper circle as you can get. Hopefully it looks like this! If not, try again! Learning new skills takes practice.

8. Repeat step 7 until you have worked a blanket stitch around half of your upper circle. This is actually a pretty widely spaced blanket stitch, but good for first learning. Now take your pen and add another dot in between each dot you have on the remaining half of your circle. This is the spacing you will usually use with a blanket stitch.

9. Complete the rest of the circle, bring your needle down through the first spot you came up in (when you first began stitching) and knot the back.

10. You now have an odd felt thingy! Actually, next week we're going to be using felt and a couple of new embroidery stitches to make not so odd felt thingies.
Now we're ready to use the blanket stitch with appliques.
Materials List:

If you have trouble finding fabric with designs you like, try a quilting store.
*Jeans, a jacket, a backpack, or a piece of clothing to decorate
*Steam-A-Seam 2 or other fusing product
*Size 7 embroidery needle
*Embroidery thread
*Sharp scissors
*Iron
*Optional: rhinestones, fabric glue (I like Aleene's Jewel-It), decorative buttons, and/or Tulip's iron on Glam-It-Up designs
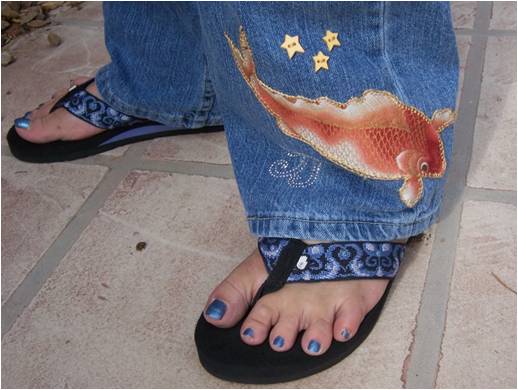
1. Decide what part of your fabric you want to make an applique from. I've decided to put a koi at the bottom of my jeans leg.
2. Cut out the design, leaving about an inch around it. Open up a sheet of Steam-A-Seam and lay your fabric face up on the sticky webbing. Lay the non-sticky top sheet back down and cut the part that has your design apart from the rest of the sheet.

3. With an iron on the cotton setting, iron your design for 10-15 seconds.

4. Peel off the top sheet and save it.
5. Cut your design out along its edges. You can make adjustments here - I decided not to cut out the whiskers on my koi as I didn't want to blanket stitch around them.

6. Peel the back layer off your design and place it on your clothing or backpack. If you're using Steam-A-Seam, it will stick there. Otherwise, pin it into place.

7. Rub the sticky parts off of the top sheet you saved. Put over your design and iron for 10-15 seconds. Let cool and then check to make sure the design is on well. If not, replace the top sheet and iron again.
8. Using the blanket stitch, embroidering around the edges of your applique. Remember to come up first on your applique - think of it as the upper circle we used when learning the stitch.

9. Possible concerns -
- embroidery thread looks too bulky: you might have a thinner applique on a fabric thinner than the denim I usually use. You don't have to use all 6 strands of your embroidery thread. Try 3 and if it still looks too bulky, go to 2.
- embroidery thread runs out before you're done: you CAN use a longer piece of thread - estimate how much you'll need, but it is usually harder to deal with really long strands of thread when embroidering. They tangle, knot, and become very annoying. To show you how to add new thread, I'm going back to our felt practice pieces. Decide you need more thread after you've come up below one of your marked dots. Go back down really near that same spot and tie off the thread on the back. With your newly reloaded needle, come up through the same spot (right under the knot) and continue working the stitch as before. It's a good idea to practice this first on felt pieces.

- your stitches are looking loose: wiggle your thread around until you get the look you want.
- your thread is all twisted: let your needle dangle as in the photo below until the thread is unwound. Some people never have trouble with this, some always do.

3. When you're finished, decide if you need a bit of bling! I used the swirls from a Glam-It-Up star design as water ripples and some decorative star buttons. I first arrange the bling and make sure it looks as good as it did in my imagination (often doesn't!), do any sewing on of buttons first, and then any ironing-on or attaching rhinestones with fabric glue.

Hints on Glam-It-Up: use that same top paper from the Steam-A-Seam to lay over it while ironing to avoid getting stray glue on your iron. I use a wool setting with steam, press down on the decal for 30 seconds without moving the iron around, and then let it cool. Move very slowly when taking the backing paper off. Sometimes it's not completely attached and I have to repeat the 30 second pressing. To make sure it's well attached, iron (with your same backing paper) on the reverse side for 20 seconds.
Tada!!
I use embroidery with appliques a lot! If you're falling in love with this and want to vary up the stitches you're using to attach appliques, Stitch School has a very good site explaining embroidery stitches. Several I think work especially well are feather stitching, lazy daisy or chain stitch, whipped running, and stem or outline.
These are a few pieces I've worked on lately - parts of an in-progress quilt top and a jean jacket and t-shirt for my granddaughter.
Happy Creating! Deborah


I just found your blog. What a treasure of information! Thank you for your time in this beautiful blog! Now I feel like I can get to work on some projects!!!
ReplyDeletekathyoberst@yahoo.com
ITS NICE AND EASY TO SEW...
ReplyDeletethank you so much :)
ReplyDeleteVery well presented. Thank you very much.
ReplyDelete@artthreads - Great tutorial! Was wondering if you have any specific technique as to how to get your blanket stitch perfect on both sides when stitching a round shape? Your help would be much appreciated, many thanks.
ReplyDeleteThank you! I have to admit that my embroidery work does not look the same on the back as it does on the front .... however, as I have done more blanket stitching lately, it is looking better on the back. So, I guess all I have to suggest is be patient with yourself and practice! Good luck!!
DeleteOh la-la-laaa what a cute & romantic bag. Lovely work!
ReplyDelete