Friday, April 29, 2011

Friday Inspiration - Fabrication Exhibit

If you've ever wondered about what university level fibers degree students work on, here are some great examples!  Last week, I attended Fabrication - the BFA Senior Exhibition for graduating Arizona State University fiber arts students.  And for the curious, you can check out ASU's Fibers program here.

Lily White, Portable Petting Garden, crochet and found objects.  2009-10

Elizabeth Goode, And Then There Was A Voice, screen print on cotton.  2011

Anya Melkozernova, Harmony, silk, shibori.  2010


Ellie Evans, Cricket's Window, cotton, silk, polyester, pigment, pastel.  2011

Bailey Curry, Heartbeat, screen print on cotton and linen, fabric markers.  2011

Heather Rice, Refuge, jute, wool yarn, fleece.  2011

Elizabeth Redmond, Cubes, screen print on cotton, polyfill, wood.  2011

Hannah Heard, Motel Print, screen print on cotton.  2010

I'll be finishing up my MA in Art Education fall semester and have extra time in my schedule, so I'll be taking a fibers class on screen printing fabric.  After looking at these inspiring pieces, I'm very excited and "just" a little nervous!

Happy Creating!  Deborah

Wednesday, April 27, 2011

Wednesday Sewing - Repurposed T-shirts Part II


When I posted the tutorial for re-purposed T-shirt bags a few weeks ago, I mentioned that I would show you later what you can do with the leftover pieces of shirt.  Some things I like to use the sleeves, neck ribbing, and T-shirt bottom for are headbands, gathered sacks, cold drink sleeves, and ribbing for other re-purposed projects.


Materials:
*pieces of T-shirt left over when you cut out a T-shirt bag
*sewing machine or thread and needle

Neck Ribbing
This is great to save for future projects that need a neckband or sleeve bands - like children's shirts and infant onesies.  At one time (ancient history!) ribbing was available in tons of colors.  Now it's hard to find, so it's nice to have different widths and colors on hand.


Headbands
1.  Cut open the T-shirt bottom at a seam.  Actually, the best shirts for this project are those T's that have either one or no seams.  If your shirt has seams, fold it so the fold is not on a seam - halfway between the two seams is good.  I wanted a gray headband even though mine had seams on both sides, so just ignore the seam down the middle!

Measure a favorite headband or use my dimensions.  I cut one piece of doubled fabric that measures 10 inches from the fold.  If you're doing one long piece, this would be 20 inches.  You can make the headband as wide as you want it to be - just decide on the width, double, and add 1/4 inch for the seam.  I wanted a 1 1/2 inch wide headband, so I cut the width at 3 and 1/4 inches.


2.  Open up, bring the raw pieces together with the right sides of the fabric on the inside, and sew in a very small seam.  I use a zigzag stitch to give the headband more stretch.

You'll now have a tube.  Turn the tube so the right side of the fabric is on the outside.


4.  Turn the edge of one tube end under about 1/4 inch.  Put the other end inside - like a snake eating its tail!  Pin and make sure the headband is tight enough. 


5.  Sew.  I use a straight stitch here.


And after taking about 30 photos of myself, I got one that actually showed all of the headband!


Cold Drink Sleeve
I love using the sleeves for these drink sleeves - it makes my iced coffee easier to get a grip on and it soaks up all that condensation that forms when the weather turns hot and humid.  I know, Arizona isn't known for humid weather, but just come visit in July and August and you won't go home talking about the dry heat!

1.  Lay one sleeve out with the finished edge on top.  Measure 3 3/4 inches down and 4 1/2 inches across.  Cut.


2.  With wrong sides together, sew the sides together in a 1/4 inch seam.  Open the seam up and, on the outside, top stitch on each side of the seam.


3.  Turn the bottom up 3/4 inch.  Top stitch to match the sewing on the finished edge - this is often two lines of top stitching.


4.  Put on your cold drink and enjoy!


Small Drawstring Bag
These are great for those little things I used to put in plastic baggies - like music players, jewelry when I'm traveling, and even snacks since they're completely washable.

1.  Lay one sleeve out with the finished edge on top.  Square off the bottom and side to make it as large as the sleeve allows.


2.  With wrong sides together, sew down the side seam and across the bottom seam.


3.  Turn right side out.  Using a tapestry needle and washable yarn ...


... sew around the top just under the hem sewing.  I make fairly large stitches.


4.  Trim yarn to about 3 inches on each end.  Tie a knot at the bag and near the end of each yarn end.  Pull yarn ends to tighten the bag.


Happy Creating!  Deborah

Monday, April 25, 2011

Monday Project - New Shirt from Old


To remodel clothes, you really don't have to do any heavy duty cutting and sewing.  Sometimes a little dye and embroidery thread can completely change the style!  I like to look for white shirts at thrift stores and then change them into new shirts by using surface design treatments.  In this post I'll show you how I did a recent one.

Materials:
*white shirt
*Procion dye - medium blue
*soda ash
*large plastic discs
*large clamps
*face mask
*plastic gloves
*embroidery thread

If you haven't used fiber reactive dyes before, take a look at this post for a more thorough explanation.  I decided to use a form of shibori called itajime - this calls for folding the fabric, sandwiching it in between wood or plastic, and clamping it all tightly together.

1.  Soak your shirt in 1/2 cup of soda ash dissolved in 1 gallon of water for about 15 to 20 minutes.


2.  Squeeze the extra water out and air dry the shirt.  There are many different ways to fold and pleat fabric using itajime techniques.  I used a form of triangle folding.  Starting at the sleeve, I first folded the shirt "fan" style - this is just like the fans you might have made as a kid, where you fold the fabric the opposite way each time you make a new pleat as opposed to doing more of a rolling fold where you keep folding in the same direction.


3.  Fold one end of the folded shirt up into a triangle.  Continue folding into triangle shapes, folding the fabric the opposite way each time.


4.  Sandwich the folded shirt between two plastic discs or pieces of wood.  I got these in a hardware store plumbing department.  Clamp everything together so the shirt is squished together as tightly as it can be.  You'll be counting on the shirt being pressed together so tightly that the dye doesn't reach all areas under the discs.


5.  With your face mask on, mix 1 tsp. of powdered dye in about 1 cup of warm water.  Spoon the dye over the exposed areas of the shirt.  You don't really want to use a lot of the dye.  I save the leftover dye in glass jars for later use.  As long as there's no soda ash in it, it'll last a couple of weeks.


6.  Put in a plastic bag overnight - garbage bags work well!


7.  Take off the clamps and rinse the shirt until the extra dye is rinsed out.  Okay - this is the point where I tell you that for some reason, my shirt did not turn out in a good itajime pattern.  In fact, it didn't really have a pattern at all.  The most probable reason is I must not have had the fabric clamped together tight enough.


8.  I wasn't happy with it at first!  When this happens, I put whatever it is I dyed away where I won't be picking it up 20 times a day and getting disappointed all over again.  Sometimes overnight is all it takes, sometimes longer, but eventually I look at it again, decide it's not so bad after all, and come up with an idea to make it better.  For this shirt, I decided to "doodle embroider" around some of the interesting shapes using a running stitch.  Doodle embroidery is just sewing in a non-planned pattern - like doodling on paper.  This is what it ended up looking like ....


... and here are four of the doodle embroideries up close:


I'm thinking it'll make a good swimsuit cover up this summer!

Happy Creating!  Deborah

Friday, April 22, 2011

Friday Inspiration - Happy Earth Day!

One of my "best days ever" is to wander through thrift shops and Goodwill stores looking for unusual fabrics, lace, and needlework.  When I find them, they're usually a garment of some type and often in bad enough condition or are so out dated, I would never wear them.  But there's enough there to take apart, mix with other pieces, dye, embellish and turn into something new.  Repurposing!  I haven't shown you much of what I do in that area, but plan to soon.

Not Your DumDum

Type "recycled fashion" into any search engine and you'll come up with loads of designers (some serious, some not so serious) who regularly use discarded  items to create new designs.  Some might call it trash, some might call it inspiration!  Here are a few of my favorites ....


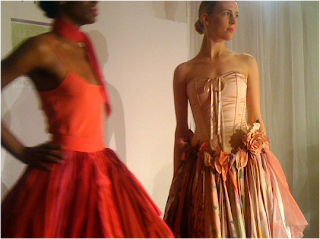
California artist Charlotte Kruk must know a lot of people who have a sweet tooth!  She uses discarded wrappers from candy (and other consumer items) to create fun fashions.  Not Your DumDum is made from Dum Dum wrappers.  If I'd only known what I was throwing away in all that post-Halloween trash when my boys were little!

Bubblicious


I love the flirty lines of Bubblicious!  And while these are sculptures, they are wearable sculptures - perfect for being noticed on a night out!  The skirt is made from the outer package wrappers and the bodice from the individual wrappers.


Charlotte is a high school sculpture teacher - how cool would it be to be in her class!  Be sure to take a look at her site - there is SO much more.


I don't think you can actually wear Linda Filley's recycled paper creations (at least not in the rain), but then I'm not sure they're created to be worn.  They are gorgeous, though!  And make me think of the garden parties one sees only on British mini-series - maybe you really see them if you live in England, but I'm sad to say that over here we don't.


Somehow, even though they're made from paper that either was or would've been thrown away, they manage to look delicate and precious.


You can see more of her creations (and keep track of new ones) on PaperTrail's website, the store in Rhinebeck, New York that shows her work.


British designer Gary Harvey actually creates his high couture designs from discarded materials - mostly fabrics, but occasionally he throws in something else.  Like this dress made from discarded newspapers!

Most of his designs fit into the category of "I love to look at these, but where the heck would I ever wear that if I could afford it" category that most high fashion goes into for me.  But it's fun to watch!


And, every once in awhile, something comes along like these dresses from recycled silk scarves that I would really wear.  That is, if I had one and if I had a "that kind of dress" type thing to go to!


Check out his website here and slides of his pieces from the 2010 Green Shows in New York City at Ecouterre's site here.


 And finally, if you're in the San Francisco area, have some extra money, and want to see what other designers can do with the whole repurposing clothing idea, you might want to check out the St. Vincent de Paul Society's annual Discarded to Divine fashion show and display at The Hall at St. Mary's Cathedral each year.  Hundreds of designers and design students submit work and it's always amazing to see the pieces (online for me!).  Go here for ticket information - sit down before you look at the prices.  It is a fund raiser for St. Vincent de Paul, though.


I'm off to Goodwill!  Happy Creating!  Deborah

Wednesday, April 20, 2011

Wednesday Sewing - Bib Apron from Jeans


I am probably one of the messiest cooks, dyers, crafters, artists, .... name an activity and I'm sure I'm among the messiest!  I have an art apron I use when I dye, but it's a little on the thin side and direct hits with splashes often leak through.  So I decided I need something heavier - and that would also work for gardening.  And pockets would be nice!  Actually, I've been mulling around what would work for a couple of months now and didn't think of repurposing old jeans for an apron until a few days ago.  I found a couple of cute small denim aprons on different blogs, but I need a bib extension to save my shirts.  This works perfectly!


Materials:
*old pair of jeans - larger than your usual size works best for full coverage.  I used a pair of my husband's.
The only other things you need are a sewing machine, thread, scissors, a ruler, and pins!


1.  I'll give you the measurements for cutting I used and will also tell you how I got those measurements.  I'm short - I strongly suggest measuring yourself so you have an apron that fits!

Determine how long you want your apron to be - how far down your legs it will go.  Measure from your waist to this point.  I got 15 inches.  I added 1 inch for a hem and got 16 inches.  Lay your jeans out on a flat surface with the backside up, measure 16 inches down the leg and mark.  Do this in several places - lay a straightedge along these marks and draw a straight line.


2.  Cut along the line you drew through the back of the jeans only (the side facing you).  You'll need the front to be longer for the ties.


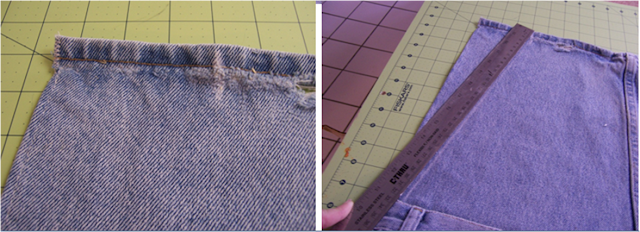
3.  Cut along the outside of each outer leg seam.  When you get to the waistband, cut a 1 inch extension tab as shown below.  I realized I took photos of two different legs - the photo on the left showing you where to cut along the seam is the leg on your left side, so that extension will point to your left.  The photo on your right shows how the extension will look when you cut the leg to your right.  If this sounds confusing, look down a couple of photos to see what it will look like.


4.  Now your apron piece will only be attached to the rest of the jeans by the inner seams.  Cut along the outside of that seam to free it.


5.  This is what you should have at this point:


6.  Cut the inseam (the crotch seam) off entirely.


7.  Cut up each side of the center seam a couple of inches and cut it out.


8.  Fold your left side under about 1/4 inch, fold over your right side and pin in place.  Sew about 1/8 inch in from the edge.


9.  Put a straight edge along the bottom, draw a line, and trim so the bottom edge is straight.


10.  Fold the bottom edge under about 1/2 inch and sew about 1/4 inch in to form a hem.  If your machine has trouble sewing through really thick seams, you need to cut a half inch out of each side seam before you pin the bottom up.  Tada!  Your apron front is done!


11.  To measure the bib portion, measure from your waist up your chest to the height you want your bib to reach.  Add 1 inch.  I wanted mine to be 12 inches so I added one inch to get 13 inches.  Measuring from the bottom hem up, cut one leg 13 inches long.  Open up by cutting on the outside of the outside leg seam.


12.  This will give you one side without a seam and one side with a bulky seam.  Cut the bulky seam off.


13.  Open up your rectangular piece.  Zigzag stitch along the bottom (non hemmed) edge.  Fold each side under about 1/4 inch and sew close to the edge.  If your machine has trouble with bulky seams, you'll need to cut in 1/4 inch at the original jeans hem, fold the side under, and then cut that little 1/4 inch extension off.  Zigzag the rough edge, where I'm pointing.


14.  Turn the apron portion over so the right side is down.  Lay the right side of the bib on top of the apron, overlapping about 1 inch.  Pin, then check to make sure it fits how you want it to. 


15.  Sew on the front, following the top sewing line already on the waistband (from when they were jeans!).


16.  Now you need to make the top of the bib narrower so it fits better.  Hold your apron up and mark where you want the outer edge of the bib to come.  I marked 3 1/2 inches in from the edge.  Put one end of a straight edge on your mark and the other edge at the edge of the apron piece (not the extension tab).  Draw a line.


17.  Fold along the line you drew and pin in place.  Make sure you leave the extension tab sticking out.


18. Sew about 1/4 inch in from the edge.  This is going to leave you with a flap of fabric on the inside.  It doesn't bother me - in fact I think it gives the bib a bit more stability.  But if it bothers you, cut if off.


19.  Cut the inseam (inner leg) seam off of the remaining jeans leg.  This will be the neck strap.


20.  Pin one end of the neck strap about 2 inches down inside one of the bib flaps.  Try it on and determine how long you want your neck strap to be - it needs to be short enough to hold up the bib, but still be long enough to allow your head to go through.  I made mine 21 inches - included in this measurement is 4 inches so I could put each side of the neck strap 2 inches down inside the bib flaps.  Pin the other side in place and sew - go back and forth a few times to get it securely on.


21. From the remaining jeans leg, cut two 26 by 2 inch pieces for the ties.  I'm about average size for roundness - if you're thin you'll need shorter ties, if you're rounder you'll need longer ties.  Fold under 1/4 inch on one short end and sew.  Fold under 1/4 inch on each of the long ends and sew.  Put the right side of a tie (unhemmed short end) to the right side of an extension tab and sew even with the edge of the apron.


22.  Place apron tie going out from the apron as shown below.  Trim the extension tab down near the sewing, fold the seam on the tie side toward the apron, and sew in place.


23.  And you're done!!  There are pockets to stick stuff in and even belt loops to hang stuff off of!


Happy Creating!  Deborah