I know I live in the wrong place for this, but I love scarves! We have about two weeks a year when a scarf is nice in the morning or evening, although those of you in northern climates wouldn't think so. And yet I keep crocheting and dying more scarves - oh, well!
In my "scarf surfing" I've recently found these gorgeous examples that I hope inspire you as much as they do me.
Sarah Saulson's website is packed with beautiful handwoven scarves and shawls. I inherited a small loom a few years ago and these make me want to get busy and actually learn how to use it. I love the way colors meld together in good weaving - it's always reminded me of watercolors.
This one uses painted warp (up and down) threads to suggest peacock feathers.
If you're interested in seeing how a handwoven scarf is created (from wool roving to finished scarf), check out Dorothy's Fiber2Fabric blog post here.
Another fiber art technique I want to learn is nuno felting. Liquid Red by artist Svitlana is a beautiful example of what can be done with the technique. I love how the fringes work in with the whole idea of the scarf dripping down your shoulders. This is from the GalleryFifty website.
The process for nuno felting included rolling and agitating a bundle of fibers wrapped in something such as bubble wrap for around an hour (this is actually the much simplified explanation) - I feel like I should go on a training regimen before I attempt this!
Suzanne Morgan is a Texas artist who does beautiful work in felting. She teaches classes (her website has a schedule) and also publishes a blog, Learned Lately, that often talks about the techniques she uses. I don't know how many more scarves I can possible use, but she's inspired me to make one of my goals this year trying nuno felting.
Creating Everyday Art
Friday, January 21, 2011
Wednesday, January 19, 2011
Wednesday Sewing - Quilted Valentine's Day Table Mat
We finally got all our Christmas decorations put away! I don't do a lot of decorating for Valentine's Day, but I do like to have some type of mat on the dining room table, so I decided to try a quilted one. This actually turned out to be pretty quick and easy.
Materials:
*1 1/2 yards material for top and bottom
*scraps or fat quarters in at least 5 different colors/patterns
*2 1/2 yards bias tape
*fusible felt
*Steam-A-Seam
*patterns
1. Print the patterns and cut them out. To make the patterns actual size, I used newspaper. For the top/bottom pattern, take a folded piece of newspaper.
Fold the top right corner down to the bottom left corner and crease.
Do this one more time.
Place the fold edge of the printed pattern along the solid fold of the newspaper. Trace the top curve of the pattern and cut along that line.
Open up and it should look like this:
For the heart applique, place fold edge of the applique printed pattern along the folded edge of a piece of newspaper. Trace and cut out.
2. Cut your scraps/fat quarters into 2 inch strips. I finally bought a rotary cutter and mat - this is definitely the way to go! I just stacked them and cut them up. If you don't have one, marking two inches with chalk marks is the easiest way I've found.
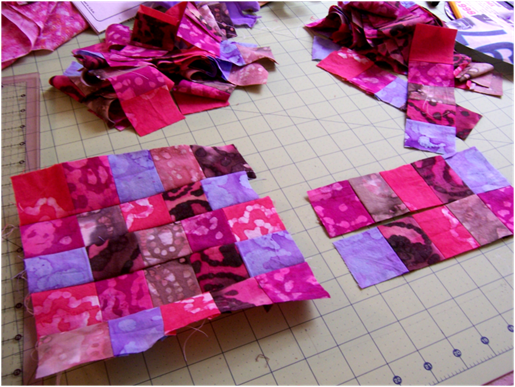
3. Using 1/4 inch seams, sew together in five strip blocks, mixing up the order of your fabrics. Press seams open.
4. Even up the ends of your blocks and cut them into 2 inch strips.
5. Now sew these strips together in 5 strip blocks (1/4 inch seams again) and press the seams open. Mix up the patterns so that every block looks different. You'll only need 4 blocks, so you might want to save the other strips for another project.
6. Trace four heart appliques onto the top side (so it will have the sticky on it still when the sheets are separated) of Steam-A-Seam. Take the bottom sheet off and iron onto the wrong side of each block.
Cut out.
7. Fold top/bottom fabric with cut edges meeting so you'll have a double layer big enough for the pattern. Pin the pattern on and cut out.
8. Remove the remaining paper piece from the appliques and position on the table mat top. I just moved them around until they looked good. Iron on.
9. Sew along edges of appliques with a zigzag stitch. On my Brother, I used a .2 length and 3.5 width.
10. Using the top/bottom pattern, cut a piece of fusible felt. Fuse to the top. Pin top to bottom.
11. Sew around the outside of the hearts and again on the inside of the zigzag stitches. Free motion quilt (I just used a random pattern) on the portions of the top fabric that are showing. See this post for a tutorial on free motion quilting.
Finish the edges with bias tape (see this post if needed) and you're done!
Happy Creating! Deborah
Monday, January 17, 2011
Monday Project - Sun Printed Fabric
I finally got to try out a fabric dying method I've been looking at for a long time! Since I live in a (usually) very sunny place, sun printing on fabric seems perfect. I ordered the dye a couple of months ago and we began having unusually cloudy or partly cloudy days. Hmmm. The last week was gorgeous, though, so I got out the dyes and tried it out.
Materials:
*Natural fabric such as cotton or silk - the paint also says it works on most synthetic fabrics, but I didn't try that out
*Pebeo Transparent Setacolor
*Paint brushes and/or foam brushes
*Tablespoon measurer that won't be used with food
*mixing containers that won't be used with food
*protective gloves - trust me, Setacolor dyes skin REALLY well
*plastic - I used painting drop cloth
*board or heavy cardboard
*sun!
1. Outside, cover a board with plastic. Mix up your paint - 2T water to 1T dye.
2. Lay your fabric on top.
3. The instructions say to wet the fabric. I did that on my first two tests and the color looked really washed after heat setting and washing. With the scarves and bubble wrap fabric (below), I painted the dye onto dry fabric and the colors didn't change.
4. Lay objects on the painted fabric. In the photo below, I laid lace over the scarf and large bubble wrap over a test piece of material. Set out in the sun and leave until dry.
This is how the lace covered scarf turned out:
And this is the large bubble wrap:
And my first two tests/results:
6. You can set the dye by ironing for 3 - 5 minutes or putting in a 300F oven for 5 minutes. I did the ironing, but the oven method sounds good if you have a lot of fabric.
As you can see from the blue scarf, even though I saturated the fabric so that the dye came through to the back, it turned really light.
With the pink scarf, I soaked it in mixed up dye, squeezed out the extra, and saved it for later. It turned out better, but the back is still lighter than the front. This isn't a problem if you're dying the material for something one sided, such as quilting, but something to be aware of if you're planning on the fabric being seen from both sides.
I wanted thinner scarves, so I folded the blue scarf in half and sewed along all the edges. I then thread sketched (same instructions as free motion quilting described here) flowers, first in a variegated thread and then went over the centers in silver thread.
The final step was to sew small beads into the centers of the flowers.
Happy Creating! Deborah
Friday, January 14, 2011
Friday Inspiration - Sherri Wood's Tattooed Baby Dolls
![]() |
| Tattoo Artist Denise de la Cerda |
I've loved Sherri Wood's Tattooed Baby Doll project ever since I first came across the exhibit two or three years ago. I've used reproductions of the dolls in the classroom as part of a curriculum unit on tattoo art and the kids always loved it!
![]() |
| Tattoo Artist Kate Hellenbrand |
While studying embroidery in San Francisco, Sherri became fascinated with the intricate tattoos she saw and noticed similarities between the symbolism and uses of both. She bought cloth bodied baby dolls at thrift shops and sent them to tattoo artists, who then drew the tattoo designs. When she got them back, Sherri hand embroidered the designs. Read more about the project here and Sherri here.
![]() |
| Tattoo Artist Andrea X. Tasha |
There are twelve dolls in all, each with a story. Be sure to check them out in the gallery here.
Subscribe to:
Posts (Atom)