Friday, July 13, 2012

Friday Inspiration - James Koehler

I love hearing how people became artists - so often, it seems that there was a chance event or meeting, a life altering decision made for reasons other than pursuing art, a lifelong love of creating that found a way to be expressed.  The late New Mexico artist James Koehler was an amazing tapestry weaver.  His elegant control over color and shape made me assume he'd studied art for many years, probably coming up through the university route.  Not so.  I recently found this video (click on the video symbol when you get to the page) made in 2007 when he received the New Mexico Governor's Award for Excellence in the Arts that tells how he came to art.  Very fascinating!

Harmonic Oscillation XXXVIII, 2006.  Cotton warp, hand-dyed wool.

Koan: Ensnared Light XIV, 2006.  Cotton warp, hand-dyed wool.


My favorite Koehler works are the pieces that make me think of the Southwest.  His Harmonic Oscillation series brings to mind the layers of mountains in graduated colors you see in the desert.  His southwest blues and oranges are awe inspiring - these are the colors in our sunrises and sunsets that sometimes really do bring tears to my eyes. 


One version of his website is still active - be sure to take a look at the large number of his works on it!

Happy Creating!  Deborah

Wednesday, July 11, 2012

Wednesday Sewing - Summer Leaf Table Mat


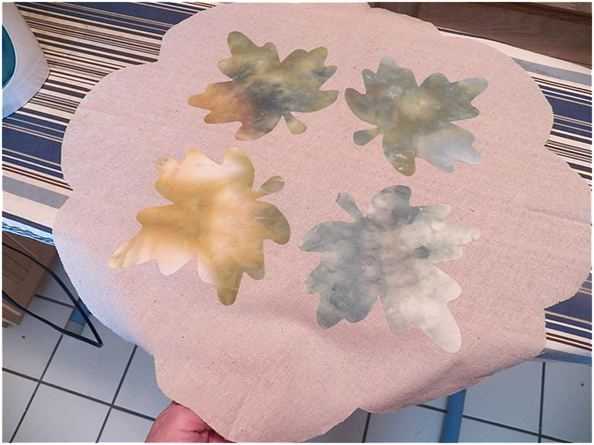
I'm now down to only scraps of the leaf colored fabric I ice dyed.  I've put together a summer leaf themed table mat using the same pattern I used for several others - I like the scalloped roundness of the design and the way it fits perfectly in the center of my dining room table.  Now if I just had a dining room!  We're installing new tile in much of the house and right now the dining room furniture is scattered throughout the other rooms.  Oh well, when everything goes back in the table will look great with its new center mat!

Materials:
*1 1/2 yards fabric for top and bottom
*about 2 1/2 yards bias tape (see this past post for making your own and attaching it)
*quilt batting or fusible felt
*Steam-A-Seam - I've started using Steam-A-Seam Lite for adding appliques.  It's not as heavy, so it's easier to embroider through
*pattern for the mat (it also includes a heart pattern you won't be using)
*pattern for the leaves

1.  Cut out the pattern.  The instructions on how to use it with folded newspaper to get a full sized pattern are here.  Cut two pieces from your fabric, one for the top and one for the bottom, and cut one piece from quilt batting or fusible felt.  To make placing the leaves easier, fold the top piece in quarters and iron so you have lines that intersect in the middle.


2.  Use Steam-A-Seam to make four leaf appliques, arrange symmetrically on the top fabric piece, and iron in place.  A past tutorial that explains using Steam-A-Seam with patterns can be found here.


3.  Sew around the edges either by hand with a blanket stitch or by machine using a close together zig zag stitch.


4.  Pin together your fabric backing, quilt batting (or if you're using fusible felt, fuse it to the back piece), and fabric front.


5.  Next, I thread stitched the leaf veins as I did with the leaf art coasters here.


6.  Free  motion quilt the background.  See a tutorial here.


7.  Finish the edges with bias tape.


Happy Creating!  Deborah

Monday, July 9, 2012

Monday Project - Fly Stitch


I've been having so much fun ice dyeing fabric that I'm starting to build up quite a stash!  One piece just begged to be embroidered - I could almost see what it would look like.  I needed a certain type of stitch to do a lot of fill-in work, though, so I turned to a stitch I seldom use, the fly stitch.  It's one I tend to forget about, but there's so much you can do with it.

 Start by bringing the needle up through the fabric.


Put the needle back down through the fabric even with where you came up.  Bring the needle back up through the fabric further down (how much further depends on how big you want your stitch to be), between the first two stitches.


Your stitch should look like this so far.


Secure the stitch by taking the needle back down through the fabric . . .


. . . to give you this stitch.


By securing the stitch further down, you can make a y shape - sometimes called a long tail fly stitch.


 It adds nice texture to large areas!


Happy Creating!  Deborah

Friday, July 6, 2012

Friday Inspiration - SAQA Art Quilt Sourcebook

SAQA (Studio Art Quilt Associates) has their Portfolio 18 Art Quilt Sourcebook online here and ready for downloading.  There are  amazing art quilts featured here - be prepared to spend some serious time looking through the 241 featured artists!


Happy Creating!  Deborah