

We finally got all our Christmas decorations put away! I don't do a lot of decorating for Valentine's Day, but I do like to have some type of mat on the dining room table, so I decided to try a quilted one. This actually turned out to be pretty quick and easy.

Materials:
*1 1/2 yards material for top and bottom
*scraps or fat quarters in at least 5 different colors/patterns
*2 1/2 yards bias tape
*fusible felt
*Steam-A-Seam
*patterns
1. Print the patterns and cut them out. To make the patterns actual size, I used newspaper. For the top/bottom pattern, take a folded piece of newspaper.

Fold the top right corner down to the bottom left corner and crease.

Do this one more time.

Place the fold edge of the printed pattern along the solid fold of the newspaper. Trace the top curve of the pattern and cut along that line.

Open up and it should look like this:

For the heart applique, place fold edge of the applique printed pattern along the folded edge of a piece of newspaper. Trace and cut out.

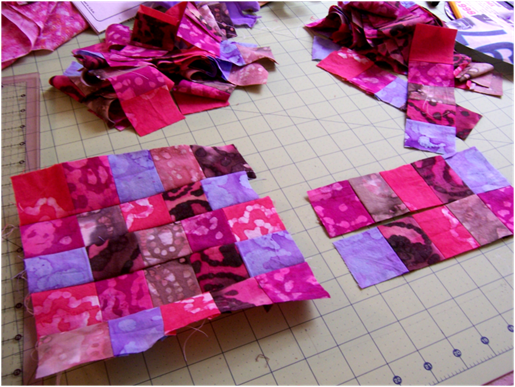
2. Cut your scraps/fat quarters into 2 inch strips. I finally bought a rotary cutter and mat - this is definitely the way to go! I just stacked them and cut them up. If you don't have one, marking two inches with chalk marks is the easiest way I've found.

3. Using 1/4 inch seams, sew together in five strip blocks, mixing up the order of your fabrics. Press seams open.

4. Even up the ends of your blocks and cut them into 2 inch strips.


5. Now sew these strips together in 5 strip blocks (1/4 inch seams again) and press the seams open. Mix up the patterns so that every block looks different. You'll only need 4 blocks, so you might want to save the other strips for another project.
6. Trace four heart appliques onto the top side (so it will have the sticky on it still when the sheets are separated) of Steam-A-Seam. Take the bottom sheet off and iron onto the wrong side of each block.

Cut out.

7. Fold top/bottom fabric with cut edges meeting so you'll have a double layer big enough for the pattern. Pin the pattern on and cut out.

8. Remove the remaining paper piece from the appliques and position on the table mat top. I just moved them around until they looked good. Iron on.

9. Sew along edges of appliques with a zigzag stitch. On my Brother, I used a .2 length and 3.5 width.

10. Using the top/bottom pattern, cut a piece of fusible felt. Fuse to the top. Pin top to bottom.

11. Sew around the outside of the hearts and again on the inside of the zigzag stitches. Free motion quilt (I just used a random pattern) on the portions of the top fabric that are showing. See this post for a tutorial on free motion quilting.

Finish the edges with bias tape (see this post if needed) and you're done!

Happy Creating! Deborah
Just a quick note to let you know that a link to this post will be placed on CraftCrave today [20 Jan 01:00am GMT]. Thanks, Maria
ReplyDeleteThis is beautiful! There's no way mine would turn out so well, but thanks for sharing!
ReplyDeleteOoh that's beautiful! Thanks so much for the how-to, I'll be linking.
ReplyDeleteThis looks really pretty, and so easy for a quick table topper, except maybe the binding!! Thanks!
ReplyDeleteYou can also use this design to make it for St Patricks day 4 leaf clover.
ReplyDeleteGood idea! I was thinking it would be an easy pattern to adapt to flowers, Easter eggs, firecrackers, ... lots of holidays.
ReplyDeleteBeautiful idea...well written. are pattern pieces actual size on letter size paper....as downloaded or do we need to resize.
ReplyDeleteThank you! The pattern pieces should be actual size on letter paper.
DeleteLooks great! I shared a link to your post on my blog. http://mysimplewalk.com/its-friday/
ReplyDeleteCan't wait to make one!
Thanks
Kelly
Love it! I got my fabric today and decided to make the bottom in green so I can just flip it over for St. Patty's day!
ReplyDeleteI love that idea!
Deleteoh my god this is beautiful, i wish my sewing machine could do the edge-sewing , but its an old one so i need to work out with hands when i finally get there to make it. anyway, great idea. nice work.
ReplyDeleteWhere are the printed instructions to download? I got the pattern but can't find the printed instructions to go with it.
ReplyDeleteThere aren't separate instructions to download - the tutorial in the post are the instructions, plus links to past posts with tutorials that are applicable.
DeleteSoooooo inspired to make this Valentine Table Mat! Beautiful!!
ReplyDeleteLove this...and the flip to
ReplyDeleteSt Paddy's Day, too
The link for the turorial on FMQ takes you to a different project. thanks
ReplyDeleteThe link takes you to "Fat Quarters Part II." This shows you how to get started in free motion quilting and gives a few simple projects made with fat quarters so you can practice the skill.
DeleteI just finished mine and I love it, hubby thinks it is great too. Thanks and the directions were great.
ReplyDeleteArtis
Awesome .....
ReplyDeleteIts so easy , but looks so rich and unique
After you make one for each season, they come out very nice. If one doesn't come out well, give it to the kids for their table. I want to do one in seashells and flip-flops...
ReplyDeleteWow what a gorgeous table topper! Thank you so much for sharing the pattern and tutorial so we can all make this for Valentine's Day!
ReplyDeleteI featured your post on my blog today, click here if you'd like to see it :)
What width of bias did you use?
ReplyDeleteI used single fold bias tape that when unfolded was 2 inches wide.
DeleteI just found this pattern while browsing for an apron pattern; distractible me forgot all about the apron. This is cute as can be! Not having on hand the Steam a Seam, I improvised and used an iron-on backing to prevent fraying, then just stitched the hearts onto the quilted fabric. Instead of bias tape, I sewed lace around the perimeter. Thanks for a fun project.
ReplyDelete