Hmmm .... I have this thing about jackets that's kinda like my scarf obsession! I love scarves and keep making new ones, I love jackets and keep finding new ones. And I live in Phoenix where I rarely have the need for a scarf and only wear jackets about 2 or three months out of the year. At least I'll get some use out of them when we're in the Northwest!
I found this unlined corduroy jacket at Goodwill a couple of weeks ago. Very nice, in great shape.... but I'm not really a cream person.
So into a bucket of Procion's Dances With Raisins it went! See this past post on fabric dyeing.
New buttons ...
and voila - a new jacket!
 I think my next remodel is going to be something lacy ...
Happy Creating! Deborah
Every year I enjoy looking at the 100's of SAQA (Studio Art Quilt Associates) benefit auction quilts - they are very inspiring! And every year I vow to make one of these 12 x 12 beauties and send it in, but that hasn't happened yet! If this is also on your to-do list, you have until June 1 to get it in - I still have hopes of doing it this year. Information is here. However, even if you're not planning on entering a quilt, you can get a sneak preview of the quilts received so far on SAQA's Pinterest board here.
Happy Creating! Deborah
For several years now I've salivated over the crocheted motif clothing made by several Ukranian designers, including Antonia Kuznetsova (I wrote about her here). I've been working on a few small pieces - it's not a quick process, but it's also not really hard once you get the knack of making the netting! This small poppy doily uses the poppy and leaf motifs I wrote about in the last couple of weeks. And yes, I've been totally poppy obsessed lately! They're one of the dominant wildflowers around here each spring and the fields of them out in the desert are breathtaking. Several years back we threw some poppy seeds around in our front yard and now have our own little patch!
Materials:
*5 crocheted poppy motifs (instructions here)
*4 crocheted poppy leaf motifs (instructions here)
*cream size 10 crochet thread
*size 7 steel crochet hook
*tapestry needle
*piece of felt - about 14 to 16 inches square
*safety pins - I like using the curved quilting ones
Poppy Motifs
1. With a slip stitch, join thread in one of the points where the yellow thread goes down into the orange.
2. Chain 4. Skip two stitches and attach the chain to the next stitch with a single crochet.
3. Chain 4. Skip two stitches again and attach the chain to the next stitch with a single crochet.
4. Chain 4. Skip two stitches and attach the chain to the next stitch with a single crochet.
5. Continue in this way all the way around the motif. Fasten off. Weave in ends with a tapestry needle. Do this with all the poppies.
Leaf Motifs
1. With a slip stitch, attach the thread to the end of the shorter end of the stem.
2. Chain 4. Attach chain with a single crochet halfway between where you attached it and the base of the first frond.
3. Chain 4. Attach the chain with a single crochet on the tip of the first frond.
4. Chain 4. Attach with a single crochet to the tip of the next frond. Continue doing this until you've attached a chain to the tip of the last front on that side.
5. Chain 4. Attach with a single crochet halfway up the stem end.
6. Chain 4. Attach with a single crochet halfway down the other side of the stem.
7. Chain 4 and attach with a single crochet to the end of the next frond. Continue chaining 4 and attaching to the end of fronds until you've attached a chain 4 to the end of the last frond.
8. Chain 4 and attach with a single crochet half way to the end of the stem you began on. Chain 4 again and attach to the end of the stem. Fasten off and weave the ends in with a tapestry needle. Do this with all of the leaves.
Putting the motifs together:
1. Pin one of the poppies to the center of your piece of felt.
2. Pin on the rest of the motifs.
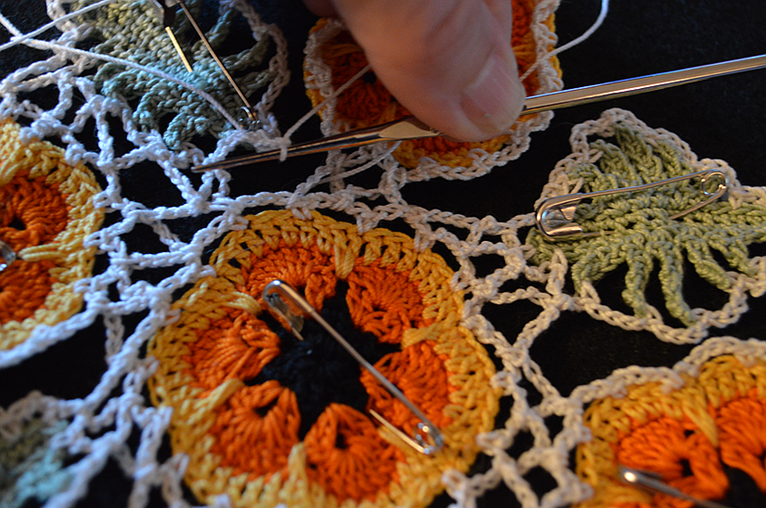
3. With a slip stitch, attach the thread to one of the chain 4 spaces of the center poppy. Whenever you attach the thread leave a long tail so you can sew in a good length that won't end up working its way out. And from this point on I find it easiest to work the netting if I put the piece of felt on a hard surface I can hold on my lap - like a large, thin book.
4. Chain 4 and with a slip stitch attach to the closest chain 4 space on the nearest poppy.
5. Chain 4 and with a slip stitch attach to the next chain 4 space in the poppy you attached the thread to.
6. Chain 4 and attach with a slip stitch to the second poppy.
7. Chain 4 again and with a slip stitch attach to the next chain 4 space on the first poppy.
8. Chain 4 and attach to the nearest chain 4 space on the nearest leaf.
9. Chain 4 and attach to the next chain 4 space on the first flower.
10. Continue connecting the motifs together with chain 4 netting until you've worked your way all around the center poppy and are back at where you began.
11. Now work down the space between the leaf nearest you and the poppy across from it. There isn't a set way to do this - I try to keep from ending up with any large spaces, like the one you see below - I undid the thread and re-netted that area. Sometimes you'll be attaching the chain 4's to a chain 4 space that already has an attachment in it - just play with it until you have an area that lies flat and doesn't have any large "hole" looking spaces. Fasten off thread.
12. Attach thread at the top of the leaf you've been working on and work down the next space, attaching the leaf to the next poppy. Fasten off thread.
13. Continue attaching leaves and poppies all the way around the doily. Remove the doily from the felt, weave all the ends in, and repin to the felt.
14. Attach thread to one of the outside chain 4 spaces. Chain 4 and attach to the chain 4 space to the left. Chain 4 and attach to the next chain 4 space. Chain 4 and attach in the same chain 4 space. Chain 4 and attach in the next chain. Chain 4 and attach in the next space. Chain 4 and attach in the same space. Continue around the entire doily keeping the same pattern. Fasten off thread and weave in the ends.
And there's your doily! I have dreams of making a shawl from these motifs someday!
Happy Creating! Deborah
It took awhile, but I have a leaf for my crocheted poppies that I'm happy with! Poppy leaves are a little ferny looking - they're not solid and that's what was causing me problems. So today I have the leaf tutorial and Wednesday I'll show you how I put the poppies and leaves together for a free-form doily.
Materials:
*size 10 crochet thread in a lighter green
*size 7 steel crochet hook
*tapestry needle
1. Loosely chain 19. Single crochet in 2nd chain from hook and in each chain. 18 stitches in all. Single crochet in the same stitch, turn chain and single crochet in each chain on the opposite side.
2. This is where you should be.
3. Single crochet in the end and then in the next 4 stitches - continuing in the same direction you've been going. Chain 4.
4. Single crochet in the second chain from the hook and in the next 2 chains. Single crochet to the next two stitches on the stem.
5. Chain 5. Single crochet in the second chain from the hook and in the next three chains. Single crochet in the next two stitches on the stem.
6. Repeat step 5. Chain 4. Single crochet in the second chain from the hook and the next two stitches.
7. Chain 3. Single crochet in the second chain from the hook and the remaining chain. Slip stitch in the next 11 stitches on the stem.
8. Add fronds to the other side in the reverse order. (Chain 3, 2 sc in chains; sc in next two stem stitches; chain 4, 3 sc in chains; sc in next two stem stitches; *chain 5, 4 sc in chains; sc in next two stem stitches*; repeat between *'s once; chain 4, 3 sc in chains) Slip stitch into next stitch on chain and fasten off.
9. Use a tapestry needle to weave the ends in.
Happy Creating! Deborah