Creating Everyday Art
Wednesday, February 9, 2011
Wednesday Sewing - Adding a Neck Placket Or What To Do When Your Toddler Thinks She's Being Smothered
Little c truly loves Elmo and one of her aunts found this great Valentine's Day shirt for her. One problem - the neck opening was too small. And little c does NOT like to have anything squished over her head! The good news is, it's really easy to add a neck placket to T's.
Materials:
*shirt with a too tight neck
*small piece of matching (or close) fabric
*small piece of 1/8 inch elastic
*button
1. Using a seam ripper, take off any tags.
2. Cut a piece of matching or coordinating fabric (about 2 x 3 inches or the size you need to give you enough to make the size opening you need). Iron the top edge down about 1/4 inch, fold over again and sew in place. Zigzag stitch around the other edges.
3. Pin onto the center of the neck back, matching top edges. Draw a long, narrow V from the top down as long as needed to make the neck opening the size you need.
4. Stitch the V. Go back over the stitching a second time and cut open.
5. Turn placket to inside, pin in place and sew close to the edges.
6. Cut a small piece of elastic, fold it in half and stitch to the inside of one side of the neck placket.
7. Sew a button on the other side of the placket.
Now there'll be a happy little c!
Happy Creating! Deborah
Monday, February 7, 2011
Monday Project - Felt Bougainvillea Garland
Wow - lots of you out there have been hammered with ice and snow and it looks like more's on it's way for this week. Stay warm! We lived in frozen Montana for a few years and then rainy Oregon for a lot more and finally found our way to (usually) sunny Phoenix. Even though it doesn't come near to touching what so much of the country is getting, we're having a fairly cold winter, too. Last week we were below freezing for three nights in a row and even though we tried to protect our tenderest plants, the yard took quite a hit. Most of them will come back from the roots and we're giving up on having hibiscus (after losing three in the last five years), but I'm sad about the bougainvillea. Usually it's in full bloom during the winter, giving our yard a nice tropical look. They'll come back up, but I still miss their flowers when I look out the kitchen window. I decided to make a felt bougainvillea garland to add a bit of color.
Materials:
*felt - bougainvillea comes in lots of colors - fuchsia, light purple, white, gold, light orange, light pink, ...
you'll also need brown for a garland base, greens for the leaves, and white or off-white for the little flowers in the centers
*large yellow beads
*patterns
1. Cut out a colored leaf/flower with the patterns found here. The colored part of bougainvillea is actually a leaf and the flowers are the little whitish centers. Using a double strand of thread and running stitches, sew around the center in a large circle.
2. Pull the two ends of the thread until you draw the circle up and crinkle the leaf/flower points. Tie thread very tightly.
3. Cut out three small flowers. I found it easier to just free hand these, but I've included a pattern in case you have very small scissors and want to try it.
4. Sew onto the top by bringing a needle up through the bottom, through the flower, through a large yellow bead, and back down to the bottom.
Repeat this for the other two flowers.
5. Cut a piece of brown felt about 3/4 inch wide and as long as you want your garland to be. I had a 2 yard piece of felt, so that's how long I made mine. If you don't have any long pieces, you can sew shorter pieces together. Fold in half and zigzag along the edge.
6. Cut two leaves for each leaf need. Put the two leaves together and decorative stitch around the outside and up the middle.
7. Place leaves on garland base and sew in place.
8. Place a bougainvillea leaf/flower next to a leaf and sew in place on the back.
9. Repeat for all the leaf/leflowers and dream of tropical places!
Happy Creating! Deborah
Friday, February 4, 2011
Friday Inspiration - More Story Quilts
I'm hoping that some of you are planning your first story/narrative quilt square, so here's a bit more inspiration to get you started. Both artists have a little different take on quilting and both are very inspirational.
Susan Shie uses fabric paint and fabric markers to first paint her narrative pictures on cotton and then quilts these. Her life, her family and friends, world events - all are used as inspiration for her amazing quilts. Susan often uses written words to help tell the stories. Many of her works take nontraditional quilted forms - these images are from a quilted book she created on her daughter's life. Be sure to check out this link to her blog where she talks about how and why she created it.
Susan teaches five day workshops at her studio in Ohio. See here for more information.
I first found the work of Dr. Joan Gaither when I ran across this quote of hers and tracked down more information on who she is:
“I am not a traditional quilt-maker, in that I break the rules. I use anything and everything that is necessary to tell the story that needs telling.” —Dr. Joan Gaither
In my own art, I like to take traditional art forms/techniques and put them together in unusual ways. Sometimes it works, sometimes it doesn't. Hers definitely work!
In this very inspirational video from her website, Dr. Gaither talks about her inspiration and process in making Journey to the White House, a narrative quilt that tells of Barack Obama's election to the US presidency. I especially like the way she linked this work to the community by bringing the quilt to different venues and allowing people to add to it with small beads or stitching, making it also theirs and part of their experience.
The School 33 Art Center website has images of six of her quilts that were included in an exhibit last year.
And here's my January square finished - probably, possibly finished. I'm looking at this as evolving art and may still work on it during the year if I'm inspired to do so! Maybe a few beads, fabric pieces, .....
Happy Creating! Deborah
Susan Shie uses fabric paint and fabric markers to first paint her narrative pictures on cotton and then quilts these. Her life, her family and friends, world events - all are used as inspiration for her amazing quilts. Susan often uses written words to help tell the stories. Many of her works take nontraditional quilted forms - these images are from a quilted book she created on her daughter's life. Be sure to check out this link to her blog where she talks about how and why she created it.
Susan teaches five day workshops at her studio in Ohio. See here for more information.
I first found the work of Dr. Joan Gaither when I ran across this quote of hers and tracked down more information on who she is:
“I am not a traditional quilt-maker, in that I break the rules. I use anything and everything that is necessary to tell the story that needs telling.” —Dr. Joan Gaither
In my own art, I like to take traditional art forms/techniques and put them together in unusual ways. Sometimes it works, sometimes it doesn't. Hers definitely work!
In this very inspirational video from her website, Dr. Gaither talks about her inspiration and process in making Journey to the White House, a narrative quilt that tells of Barack Obama's election to the US presidency. I especially like the way she linked this work to the community by bringing the quilt to different venues and allowing people to add to it with small beads or stitching, making it also theirs and part of their experience.
The School 33 Art Center website has images of six of her quilts that were included in an exhibit last year.
And here's my January square finished - probably, possibly finished. I'm looking at this as evolving art and may still work on it during the year if I'm inspired to do so! Maybe a few beads, fabric pieces, .....
Happy Creating! Deborah
Wednesday, February 2, 2011
Wednesday Sewing - January Story Quilt Square
Well, I didn't quite get my January story quilt block done. We're missing all of the snow and blizzards, but Phoenix is getting some of the cold air. Since we'll be around freezing tonight and down in the mid to low 20's tomorrow night, I spent a large portion of the afternoon covering plants. Luckily I have everything done except the last of the hand sewing, so I can get you started on your squares!
If you're new to this blog, last September I discovered Harriet Power's story quilts and wrote about it here. Her quilts inspired me to make a story quilt about 2011 and I'm hoping that she inspired some of you to make one along with me. I've set up a Flickr group here where we can post our monthly quilt squares and see what everyone else is doing.
Materials:
*various fabrics
*Steam-A-Seam 2
*photographs
*embroidery floss
1. I knew exactly what I wanted to make this month's square about - little c's (my granddaughter) first birthday party! It was a hoot! Her baby cousin, toddler cousin, and toddler twin friends came along with numerous adult family members and family friends. Nobody fell apart, everyone got cake, and present opening was a group affair!
The first thing I did was to make a montage of photos that I thought would help me make a scene from the party.
2. Looking at the photos, I drew a rough sketch. To make things easier, I decided to make each square the size of printer paper. Don't get caught up on your drawings - this is just to plan what goes where, so you can just use labeled shapes if you want.
3. Pick people or objects you're using out of the photos and make them the size they'll be on the quilt square. I find this easier to do on PowerPoint than on Word. Also, I print them out in black and white (when I remember to change the setting) since I'll just be cutting them up.
Cut out each figures and place on the square.
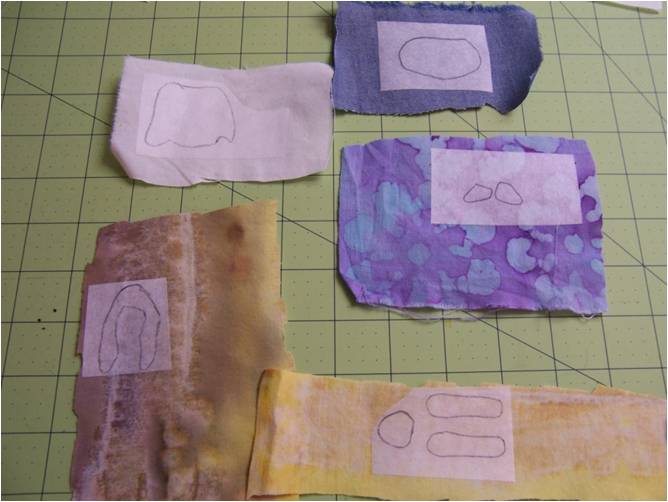
4. Cut each figure into separate parts - I cut out each piece that needs a different color. Trace these pieces onto the side of Steam-A-Seam 2 that has the fixative.
5. Cut apart.
6. Peel off the backing paper and iron (cotton setting for about 5 seconds) onto the wrong side of fabric.
7. Cut out each piece and stick (this is why you're using Steam-A-Seam 2) onto the quilt square. Don't iron into place yet.
8. Continue this way until you have all pieces on your quilt square. This takes a bit of time, but isn't really hard.
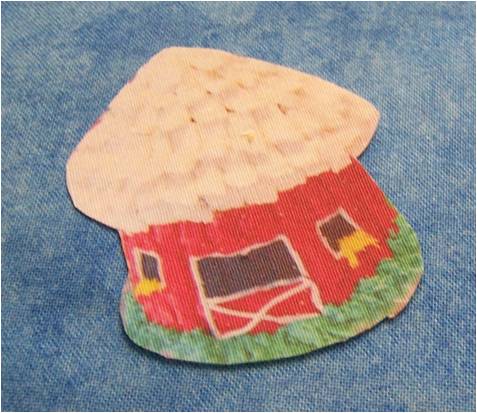
After several attempts to make replicas of the cake, cupcakes, and little c's Birthday Girl shirt, I gave up and ran the photos off on photo printer paper. I show you how to use that in this post.
My daughter-in-law made the barn cake and animal cupcakes - aren't they darling?!
When you're sure everything's in the correct place, put a pressing cloth over the top and iron on the cotton setting for about 30 seconds.
9. I'm not planning on having this art quilt be washable, but the edges still need to be finished to give the quilt a finished look. I used hand embroidery stitches - blanket stitching to go around the edges and stem stitching to add in details.
Here's what I have so far. I'll post a photo of my finished square on Friday and also in the Story Quilt Flickr group.
Happy Creating! Deborah
Subscribe to:
Posts (Atom)