Friday, March 11, 2011

Friday Inspiration - Felt Artists

I've recently found three felt artists who greatly inspire me!  All three create their felt by hand and are able to put such light into their work that I'm amazed it is solely felt.

Written in Stone IV

Sharron Parker's felt seems to glow from within.  She's inspired by what she sees in nature, not trying to recreate what she sees, but creating something new.  The piece to the right is from her Earth series - her website gallery also has series on Light, Living Things, and Color.  And if you're in the area, she'll be exhibiting at CraftNEWYORK 2011 April 1 - 3 and presenting a workshop at the Surface Design Association International Textile Conference June 7 - 8 in Minneapolis.

Willa of Whim


I love Michele Dodd's work - the colors, the way she uses light, the sculptural fantasies, everything!   Her website has many felt sculptures and hanging pieces (the depth on these is wonderful), plus her paintings.  It's a fun site to spend some time exploring.


Chroma Passage


Chroma Passage by felt artist Janice Arnold has to be one of the most amazing things I've seen for quite some time!  I had to keep reminding myself that she makes all her felt by hand.  This was installed in the Grand Rapids Art Museum (Michigan) last year - videos showing the two months it took to install compressed down to 7 minutes and a short viewing of the work, along with photos of the passage can be seen on Janice's website here.

Palace Yurt
Janice's Palace Yurt might be on exhibition at the San Franciso Museum of Craft and Design - it's on her website, but I couldn't confirm it on the museum's site.  This was originally installed at the Smithsonian Cooper-Hewitt National Design Museum in New York in 2009.  See more information on it here.


Happy Creating!  Deborah

Wednesday, March 9, 2011

Wednesday Sewing - Robins!


One of the things I miss about living up North is the robins returning in the spring.  It's always so good to see them again!  I thought that when we moved to Arizona, I'd still be able to see robins since pretty near every bird habitat map showed this area as their wintering ground.  Hmmm - I've yet to see a robin in the Phoenix area.  They might be here hiding somewhere.  When our apple trees began blooming last week, I suddenly missed robins again.  Apple blossoms and robins just seem to go together!  So now, our apple trees have robins - kind of ....

Materials:
*felt - robins are a brownish-gray and the felt I've found is not, so unless you have a great source I don't know about (tell me, please!) you'll have to pick browns or grays.  Not quite robin color, but close.
*ribbon
*wide hole bead
*large gray or black bead
*small gray or black bead
*pattern found here

1.  Cut two of each pattern piece if you want your robin to be two sided.  I used dark gray for the larger bird silhouette and the larger wing, light gray for the smaller bird silhouette, black for the head cap, and red for the breast area.

2.  Lay the smaller silhouette on the larger one, trying to leave an even amount of larger silhouette showing underneath.  Lay the breast and head cap on as shown below. 

Sew along the top of the breast and the bottom of the head cap.  Repeat for other side.


3.  Lay the wings on as shown below.  Sew around the smaller wing.  Repeat for other side.


4.  Sew an eye on each side by bringing the needle up through the the large bead, then the small bead, and then back down through the large bead only.


5.  Put both sides of the bird together.  Cut a one foot piece of ribbon, fold in two, and place the open end between the two bird sides - make sure about an inch goes down into the bird so it'll be anchored firmly.   Sew around the smaller silhouette.  This won't be perfect on the opposite side, but it will work fine.  Slip a wide hole bead onto the ribbon and tie a knot just above it.


Now the robins have returned - it must be spring!

Happy Creating!  Deborah

Monday, March 7, 2011

Monday Project - Layered Felt Spring Bookmarks


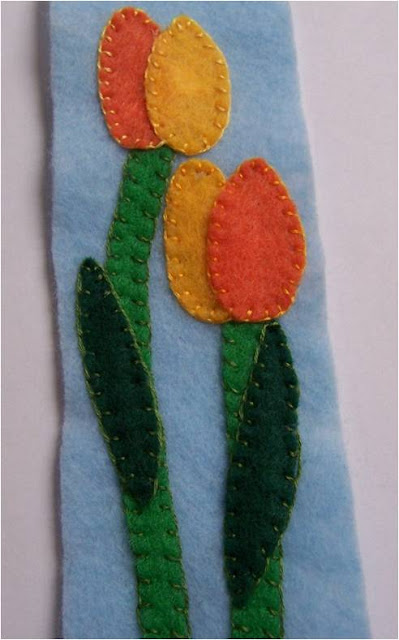
This week, I'm taking a break from working on my complex cloth - I need to think about a couple of different ways I can go with it.  So --- it's looking a lot like spring around here and I need new bookmarks!  I've been enjoying my peach tree's blossoms and was inspired to make a peach blossom bookmark.  For the other one, I decided on tulips.  When we lived in up north, I had huge beds of tulips that looked beautiful every spring.  Now that we're in Arizona, I have to get my tulips from the store - I know, you can put the bulbs in the refrigerator for a few months and then plant them.  It didn't work so well for me.  I love all colors, but my favorites are probably the part yellow/part orange tulips I put on the second bookmark.


Materials:
*felt - for these I used brown, two kinds of pinks, two kinds of green, yellow and orange and light blue and cream for the backgrounds
*embroidery thread
*thin ribbon
*hole puncher
*felt glue
*patterns found here

I went into detail on making layered felt bookmarks in this post, so if you haven't done this before take a look at it first.


Peach Blossom Bookmark

1.  Cut two large and two small blossoms from light pink and two large and two small blossom centers from darker pink, a branch from brown, and two 2" x 6" rectangles of cream felt.

2.  Use a couple small dabs of glue to stick the branch onto one of the pieces of cream felt.   Use two strands of embroidery thread and a blanket stitch around all edges to attach.  Arrange the blossoms on top of the branch and embroider into place.


3.  Add the blossom centers and embroider into place.  Using three strands of thread, create stamens in the center of each blossom by sewing a short straight line and topping it with a french knot.


4.  Pin the second piece of cream felt onto the back.  Using a hole puncher, make a hole in the center of the top.  Using six strands of embroidery thread, attach the two cream pieces of felt using a blanket stitch - do not tie off yet.  Cut your ribbon and attach, taking a small stitch through the loop to secure.


Tulip Bookmark

1.  Cut one bottom petal from orange, one bottom petal from yellow, one top petal from orange, one top petal from yellow, two leaves from one of the greens, long and thin rectangles from the other green (the stems), and two 2" x 6" rectangles from light blue.

2.  Use a couple small dabs of glue to attach the stems to one of the light blue pieces.  Using two strands of embroidery thread and a blanket stitch, sew in place.

3.  Add the two bottom petals and then two top petals and sew in place.

4.  Add the leaves and sew in place.


5.  Using three strands of embroidery thread, create stamens at the top of each tulip by sewing a short straight line and topping it with a french knot.


6.   Pin the second piece of light blue felt onto the back.  Using a hole puncher, make a hole in the center of the top.  Using six strands of embroidery thread, attach the two light blue pieces of felt using a blanket stitch - do not tie off yet.  Cut your ribbon and attach, taking a small stitch through the loop to secure.


Happy Creating!  Deborah

Friday, March 4, 2011

Friday Inspiration - Erin Endicott's Healing Sutras

Detail of Healing Sutra #15


If you love doing any type of fiber work, you probably know the feeling of peace that comes when you are finally able to sit down with your yarn or thread and begin working on a favorite stitch or an intriguing new pattern.  This is one of the big draws for me - I'm sure there's research out there about endorphin levels rising!  So I totally get Erin Endicott's Healing Sutras.

Healing Sutra #11
Erin takes antique clothes and fabrics that belonged to women in her family (you know - the ones that are kept in boxes under beds and in closets and only brought out for occasional viewing) and gives them new life by using embroidery thread, beads, and walnut ink to record her visions of pain, wounds, memories and healing.  She writes, "... it comes down to the stitches.  One stitch at a time, hour after hour ... this is where the healing lies."


Healing Sutra #7


I learned that in Sanskrit, sutra literally means "to stitch; a thread or line that holds things together."  I love the vision of generations of women connected by this stitching.


Healing Sutras was shown at Anagnorisis Fine Arts in New York City last fall.  Erin's next show will be Transforming Touch at River House Arts in Perrysburg, Ohio from May 6 - June 5, 2011.  I can't wait to see her new work!

Be sure to see more on Erin's website.


And in a side note --

Today I'm celebrating my 100th post!  That hardly seemed possible last July when I began.  Thank you to everyone who follows along with me on my fiber adventures!

Happy Creating!  Deborah