Creating Everyday Art
Monday, March 14, 2011
Monday Project - Using Thickened Dyes
I'm back to working on my complex cloth! When we last left the two I worked on this weekend (this blog post), I had used discharge paste and they looked like this:
Then I washed them. And forgot to use Synthrapol - actually, since I'd already washed them once, I wasn't expecting them to run any more. I was wrong! The dye back stained in the areas I had just discharged. For the darker fabric, I liked it better - there was a little color in the previously white areas.
But I hadn't completely discharged the bluish fabric - I stopped before I had white showing. So when the dye back stained those areas, it filled them in and you couldn't tell what I'd done. Hmmmm. I decided to retie and pole wrap the fabric as arashi and put discharge paste on again. This time, I discharged to white and put Synthrapol in the wash water. It looked like this:
It was time to start the next step - using thickened dyes. Thickened dyes are good to use when you want the fabric you're working on to have a soft feel and be completely dyed, not painted. However, if you want a crisp line with absolutely no bleeding, you'll probably be happier with fabric paint. Most of the materials I'm using I've talked about in detail in this post. I've added links to new materials to show where you can buy them.
Materials:
*fiber reactive dyes like Procion
*soda ash
*sodium alginate
*urea
*Synthropol or other textile detergent
*small containers and utensil for mixing - don't use anything that will be used for food. I like to use plastic that I would have been recycling
*gloves
*face mask
*paint brushes, stamps, stencils
1. Mix up the dyes. First mix 3/4 cup of urea (this keeps the dye wet on the fabric longer, helping to get a good dye set) and 1 quart water. This is commonly called "chemical water."
The usual way to proceed is to mix the sodium alginate (1 - 4 tsp.) into this until it is as thick as you want it to be. I do this a little differently.
I take about 1/4 cup of the chemical water and add 1/2 tsp. soda ash, about 1/2 tsp. of dye powder, and about 1/2 tsp. of sodium alginate and mix well. The sodium alginate will clump - keep stirring and it will mostly dissolve. Wait a couple of minutes to see if it's the thickness you want, and then begin adding more until it reaches that point. For less bleeding, make the dye thicker.
Once you've added the soda ash, the dye will last for about 4 hours.
2. At the end of adding the dye, you will want the fabric to sit for around 6 hours and, optimally, stay damp for that time. I do this by first laying down a layer of painter's plastic, laying the fabric over it and then folding the plastic up over it when I am done painting/stamping. Then I just put the next fabric on top, paint/stamp it, and fold more of the plastic over it when I am done.
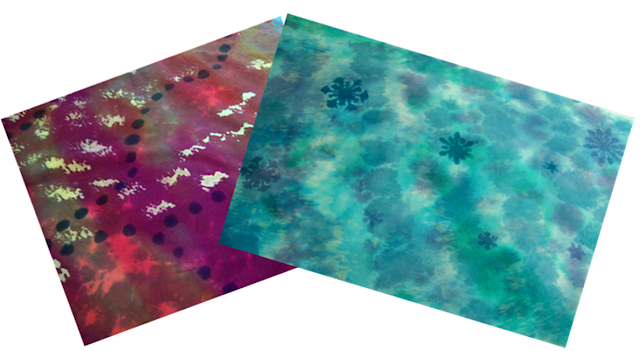
3. For the darker fabric, I wanted to stamp triangles in radiating lines. I used a block I'd cut into that shape and a slightly thickened dye. As you'll see, I probably could've used a thicker dye - it spread pretty well and ended up looking more like a circle.
To make the stamping easier, I pour some of the thickened dye into a smaller cup and just press the stamp into it and then onto the fabric.
4. After about 6 hours, rinse out and wash. Here's what it looked like when I was done.
5. To stencil, I like to use a very thickened dye.
6. Brush it onto a stencil like this:
7. I press the brush against the edge of the cup containing the dye to get most of it out before I paint it onto the stencil. If you have too much dye you get a lot of running - the snowflake on the right was done with very little dye and making a "stabbing" motion down into the stencil with the dye.
8. Here's how that fabric turned out.
Next week, I'll show you what I've been doing on the other two fabrics.
Happy Creating! Deborah
Subscribe to:
Post Comments (Atom)


Just a quick note to let you know that a link to this post will be placed on CraftCrave today [15 Mar 01:00am GMT]. Thanks, Maria
ReplyDeleteThe blue is fabulous! Makes me want to dive in and swim!!
ReplyDelete