Creating Everyday Art
Monday, February 28, 2011
Monday Project - Discharging Fabric
Today is the third in my series on making complex cloth. See this post for how I began and last week's post for my second additions to the cloths.
I'm working with three cloths now and decided to keep back one of the four I originally dyed. After gazing at it for two weeks with no great inspiration appearing, it seemed better to put it away for awhile. This week I used two ways of discharging (or removing) some of the dye I've put on. This can be a way to add another layer, more texture and design to your cloth and to make it look more interesting.
Materials:
*discharge paste - I buy mine from Dharma Trading Company
*bleach pen
*gloves
*face mask
*steam iron
Discharging with Bleach
After my shaving cream dyeing session, this is what one of the cloths I worked with ended up looking like:
Not bad - lots of color, some texture. But not real interesting, either, so I decided to remove some of the dye in a pattern using a bleach pen. I covered using bleach pens more in depth in this past blog - basically, you put on gloves, put the piece of fabric on a flat surface with protection underneath (I put waxed paper underneath), and apply the bleach pen. If you're covering a large area like I did, you'll probably want to do this outside as there can be a pretty strong bleach smell.
Bleach sometimes takes all the dye out, leaving white fabric, but just as often will leave yellow, tannish, or some other color. This can be just what you want - make sure to do a test first so you get no bad surprises.
I made a squiggle pattern over the whole piece, let it dry, and then washed it out. Here's what it now looks like:
One thing you might not know about bleach - it never really quits working unless you neutralize it. There are lots of home methods for doing this (some people say vinegar works), but the only way to be sure is to use a product such as Bleach Stop or Anti-Chlor (sodium thiosulfate). I use Bleach Stop from Dharma Trading Co. It's not very expensive and lasts a long time.
Discharge Paste
This stuff is pretty stinky, so I always work with it outside. I also use a face mask - I know it's not the kind that you need for keeping out fumes. You don't have to go that far with the paste. It just helps me not smell it! Basically, you just paint it onto the fabric, stamp it, stencil it - whatever. You wait for it to dry and then steam iron it until all (or the amount you want) of dye has been discharged. One of the nice points this product has is that it doesn't take the dye out until it's been dried and you've steam ironed it. So if you goof or decide you didn't want to discharge in that pattern after all, you can wash it out and start over.
When we last saw the reddish/pink fabric, it looked like this:
I wanted to break up some of the solid areas, but leave the shibori circles, so I dabbed on discharge paste with a small piece of sea sponge.
When it dried, I steam ironed the piece until all the dye had discharged and I had white areas. Here's how it ended up:
Hmmm. Definitely interesting!
After doing a form of arashi shibori with the blue fabric, it looked like this:
I decided to retie it in a more traditional arashi form and apply the discharge paste as I would have applied dye. To do this type of arashi, you need a long pole so I taped three of my short poles together. You want to have the tape lie as flat as possible since you'll be pushing the fabric over the tape.
Place a corner of the fabric in the middle of your pole and tightly roll the fabric around the pole. If you have a large piece of fabric, you'll want to tape the corner to the pole.
Tie one end of artificial sinew around the top. Wrap the fabric at even intervals - the interval size will change the pattern you get so experiment. Tie the bottom.
Stand the pole upright and push the fabric down as far as you can, while also twisting it around the pole. It takes a little coordination and a lot of muscle! I was able to remove one of the poles after it was all pushed down.
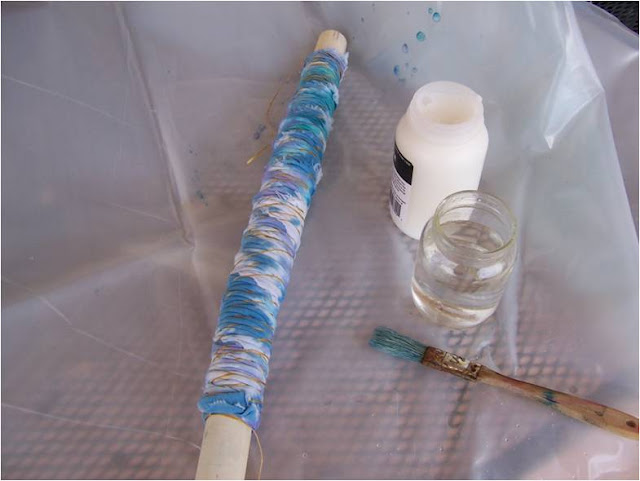
I then painted discharge paste over the whole piece and let it dry.
Take the fabric off the pole and you get a cute little tube! I love the texture when it's unwrapped, before ironing. I've seen some very nice shibori fabric art where the artist left it unironed to keep this texture.
On this piece, I only ironed over it real quickly - this way I took some of the dye out but not all the way down to white. This is the result:
I love this one! This closeup shows the pattern.
Next week I'll use stamps, stencils, and thickened dye to add yet another layer.
Happy Creating! Deborah
Subscribe to:
Post Comments (Atom)


These are dso beautiful! I love the blue one, it reminds me of ocean water! I'm inspired! Maybe I'll try this when school is out, sound fun for me and my son to try. Thank you for the amazing photos!!!
ReplyDeleteJust a quick note to let you know that a link to this post will be placed on CraftCrave today [01 Mar 12:00am GMT]. Thanks, Maria
ReplyDelete