Creating Everyday Art
Monday, March 26, 2012
Monday Project - Indigo Dyeing
I've been playing around with using freeze dried indigo crystals to set up an indigo vat. Very easy and very nice results! Using the crystals, you skip the mashing and fermenting steps - something I definitely want to try doing, but out of the question now. While I live in Phoenix and it gets very hot here, it's not tropical, so the main indigo bearing plants won't grow here. I've had pretty good luck growing temperate vegetables by planting them in September, though, which might work with Japanese indigo or woad.
Materials:
*pre-reduced indigo crystals - I bought mine from Dharma Trading Co.
*thiourea dioxide (usually just called thiox )- again, Dharma was my source
*soda ash - available from Dharma or a pool supply store
OR
instead of the three above ingredients, you can order a pre-measured indigo dye kit
*5 gallon bucket with lid (very important to have the lid)
*long stick or dowel
*face mask (I use a rubber respirator mask with gas/vapor cartridges, which is a necessity if you have allergies or asthma and recommended otherwise)
*rubber gloves
*natural fiber fabric or yarn
I follow the instructions on Dharma's website - measurements are given in both grams (if you have a gram scale) or ounces. For a 5 gallon bucket, you need 50 grams or 3/4 ounce indigo crystals, 160 grams or 2.3 ounces thiourea dioxide, and 240 grams or 3.5 ounces soda ash. Measure these out ahead of time with a face mask on. Dissolve as much as you can of the soda ash in a little boiling water.
Put 3 gallons of cool tap water into the bucket and add the indigo. Now I put on my vapor cartridge mask! It gets stinky - did I mention this should be done outside or in a well-ventilated area?! Add the thiox to the bucket and then the soda ash. Stir gently with the stick/dowel in one direction - your goal here is to mix up the ingredients with the least amount of oxygen introduced. Don't make bubbles or be vigorous. A foam will start forming - this is known by different names, like the "flower." This helps keep oxygen out of the indigo vat. Put the lid on and let it settle for at least one hour. I usually mix up a vat in the morning and wait until after lunch to begin dyeing.
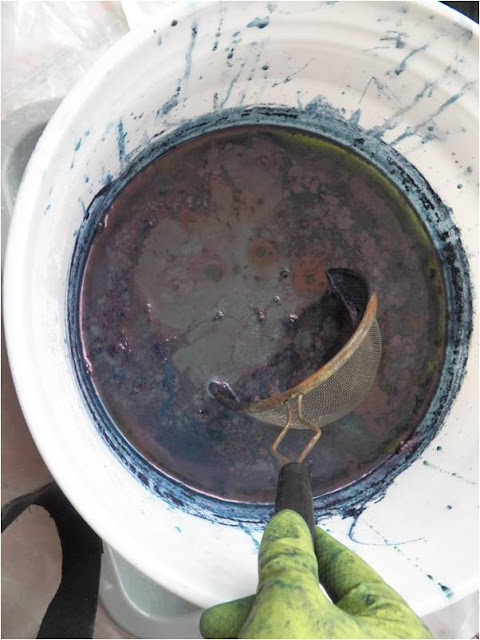
When you take off the lid, you'll see the foam/flower on top. Gently scoop this off and save it - I use a small kitchen sieve with a handle and put it into a tub. You'll be putting it back on after your dyeing session.
This is about what your indigo vat will look like - a clearish, yellow liquid with a coppery film on top. There'll be blue in the places where the dye is interacting with oxygen.
Thoroughly wet the fabric you want to dye - I let it soak an hour or so. When you put the fabric in the dye, you want to do it in a way that introduces the least amount of oxygen into the dye vat. Hold the fabric under the water, squeeze, and then lift from the soaking tub. Still squeezing, submerge it in the indigo vat, staying above the sediment on the bottom. Now you can quit squeezing and move the fabric around the vat. How long you keep the fabric in will determine how blue it becomes. You can always dye the fabric again to get a darker blue. When you take the fabric out, squeeze the fabric while it is still in the dye and then remove, trying not to have lots of dripping going back into the vat.
Don't die of shock when you see the color of your fabric! It will come out a spring green color, change to a greenish teal, and then keep oxidizing until you get indigo blue! When you're done dyeing, put gently put the foam/flower back on top of the vat and put the lid tightly on.
I dyed a chiffon scarf for little c and a piece of eyelet in this session and also did a clamped, resist cotton scarf. This is the long, skinny type of scarf. I folded it lengthwise into eighths ...
... folded the sides in to form a triangle...
... cut enough triangles from old plastic lids so that I had one to fit in each layer plus the front and back - on each side ...
tied the whole bundle tightly with waxed linen ...
... clamped the triangle on each side ...
... and submerged it in the indigo vat for about a minute. After it's done dripping, undo the bundle and open the scarf up to let oxygen reach everywhere. The results are the blue and white scarf in the top photo. It was still oxidizing, so it's a bit green in places.
I also dyed those free form crochet shapes I made by submerging some for differing amounts of time and dribbling dye over the mesh piece.
I'm still working on more indigo dyeing - you'll be seeing results in the coming weeks!
Happy Creating - Deborah
Subscribe to:
Post Comments (Atom)


No comments:
Post a Comment