I always have a hard time giving up our Christmas decorations! I love the tree with its ornaments and lights - everything is so sparkling and cheery looking. So several years ago I started gathering snowflake and snowman decorations and artwork to help ease my transition and avoid having a Christmas tree still up in March. This quilted snowflake mat keeps my table looking festive for a bit more! And it was made entirely from scraps of fabric and fabric from my stash, keeping my resolution to not buy any new fabric for a few months.
Materials:
*2 24 x 15 inch pieces of fabric for the front and back
*24 x 15 inch piece of fusible felt
*a fat quarter size of fabric for the snowflakes
*2 1/2 yards double fold wide bias tape (to make your own, see this past post)
*2 skeins variegated blue embroidery floss
*assorted beads
*Steam-a-Seam 2 - in 8 1/2 by 11 inch sheets
First you'll need to make the snowflakes. Be sure to read through all the snowflake instructions before you cut any - I have a second option on how to do this at the end. This way of folding gives you a six point snowflake, like snowflakes really are.
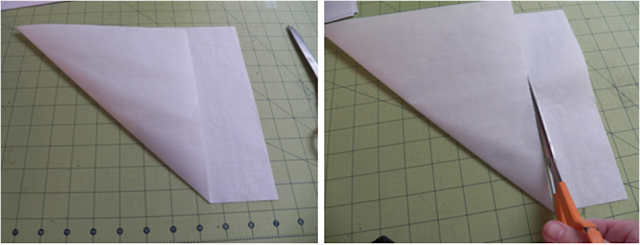
1. Take a sheet of Steam-a-Seam 2 and fold one corner up to make a triangle (we're making what will be a square when it's unfolded). Cut off the rectangular end.
2. Cut the square into four smaller squares.
3. Take one small square and fold corner to corner to make a triangle. Arrange the triangle with the long edge at the top (first photo below) and fold in half again to form a smaller triangle.
4. Turn your triangle to the position shown below, making sure that the folded edge is where the arrow points.
5. Fold the left edge over and then fold the right edge over it. You get a shape that reminds me of a Star Trek badge!
6. Turn over and trim off the bottom of the piece at the straight edge.
7. Draw lines on your shape and cut along them, making sure you leave connections on the folded edge so your snowflake doesn't end up in pieces. You can follow the lines I used or experiment and make your own.
8. Open up and you have a snowflake!
9. Here are the other two designs I used.
10. Remove one side of paper and press onto the wrong side of your snowflake fabric and press on (about 15 seconds does it). Cut the snowflakes out.
Okay, now here's the other option. You can take those small squares of Steam-a-Seam 2 from step 2 and attach them to your snowflake fabric. Cut out and then proceed with the folding instructions above and your snowflake will be ready to attach to the front fabric without extra cutting. Here's the catch - you have to have thin snowflake fabric and very, very sharp scissors to handle all that folding and still be cutable. I didn't like the way mine looked, it was pretty ragged. The more time consuming way gave me much nicer looking snowflakes.
Once you have snowflakes, it's on to the quilted table mat.
1. Remove the remaining paper from the snowflakes and arrange on your top piece of fabric. Iron into place. Finish the edges by embroidering with a blanket stitch, using 2 strands of a variegated blue floss.
2. After I was all finished with my mat, I decided it needed a bit more pizazz, so I added beads. You'll want to add beads now, before the back is attached, so the thread ends will be hidden. This works if, like me, you don't quilt on the snowflakes.
3. After you're done with the beading, iron the fusible felt onto the back of the back piece. Layer with the front piece of fabric.

4. Pin through all layers about 6-inches apart. A little aside here - I went to a new quilting store awhile ago and found these great curved safety pins that are wonderful for pinning quilt layers together. Much easier! I'm probably the last one to know about these.
5. Beginning in the center, free motion quilt the background of the mat. I used a swirling pattern to give the motion of snowflakes falling.
6. Fold the mat into quarters and cut the corners into rounded corners.
7. Open up the bias tape and pin to the edge of the right side bias tape to the right side of the front. To join, overlap the ends by 2 inches (because the bias tape is 2 inches - if yours if a different width, overlap the ends by that width).
8. Pin right edges together at a right angle ...
and check to see that you haven't twisted the tape and that it is the right fit.
9. Sew diagonally from corner to corner ....
and trim the seam. Sew bias tape to mat front using the fold line that's nearest the edge as a guideline.
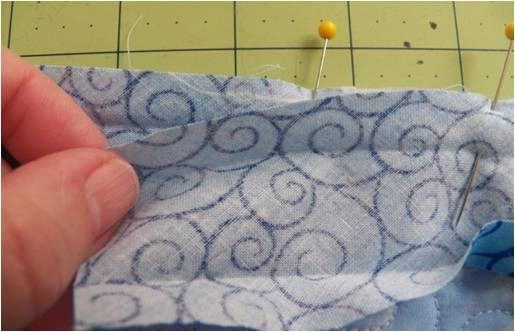
10. Turn bias tape to the back and pin in place.
11. Hand sew using a blind hem stitch - there are several ways to do this, see photo below for how I do it.
And you're done!
Happy Creating! Deborah


Great! Love the process..Thanks :)
ReplyDeleteThanks for this tutorial. Simply beautiful. Kisses from Venezuela!
ReplyDeleteThanks for the tutorial and I would love it if you would link it up to my Show It Off Thursdays party at:
ReplyDeletehttp://ornamentplace.com/?p=1140
Thanks, Linda
The swirls are so beautiful on the fabric and in the quilting. It makes me think of the art work that I've seen of a winter sky with big billowy clouds puffed up like cotton balls in the sky. The clouds often have a face with a mouth puckered as the cloud blows great gusts of cold winter air.
ReplyDelete