I've graduated to knitting sweaters! I have a post started on the pattern I used to make the transition from scarves and washrags to clothing .... unfortunately it is on the hard drive of a computer that died! The good news is the hard drive is fine and I'll be able to retrieve the post soon.
Currently, I'm working on a Christmas sweater for Henry that will be able to be changed so it can be worn after the holidays - these things are lot of work for something that will only be worn for a few weeks! The yarn is City Tweed DK, a wool/alpaca blend from KnitPicks and the pattern is from a great book, Natural Nursery Knits by Erika Knight.
And since Henry's here visiting, I had to make a couple of Christmas flannel receiving blankets! See this past post for how I do this.
Happy Creating! Deborah
After spending the fall so far in cooler, northern climates I feel like summer's returned! I'm back in Arizona and so enjoying the warm weather, fruit ripening, my garden, the flowers, and the lemons, figs, and clementines.
And catching up with the kittens (though you can hardly call them that anymore!) that were born in our attic last spring. They've made the transition to being house cats wonderfully - can you tell by how they love to lounge on beds?
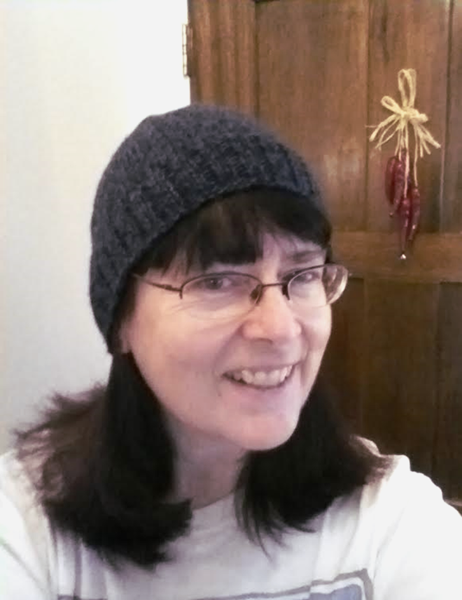
Since I'm enjoying my second chance at summer, it might seem strange that I knitted myself a hat! Well ... after knitting several hats for baby Henry and for a friend's baby that's due soon, I got to thinking how nice it would be to have a bigger version of the baby hat for me. I have lots of hats - lots of pretty hats. And when I'm up on the farm working out in the cold, I either don't wear a hat because they're too nice or I wear one meant for guys, which keeps falling down over my eyes. Very annoying! My Working Hat turned out to be just what I wanted - warm and fit perfectly ... and I think it still looks nice!
Materials:
*1 skein worsted weight yarn (you won't use it all) - I used Lion Brand's Wool-Ease in Denim Twist
*16-inch size 6 circular knitting needle
*4 size 6 double pointed needles
*tapestry needle
1. Because I didn't want this hat to be so loose that it fell over my eyes, I made it to fit. Measure snuggly around your forehead just above the eyebrows. Subtract one inch. Now multiply this number by 5. My measurement was 22 inches. I subtracted 1, which gave me 21 and multiplied 21 by 5 getting 105. Because of the type of ribbing I used, I needed this number to be divisible by 3 - no problem, it is! So I cast on 105 stitches. If you end up with a number that is not divisible by 3, add either 1 or 2 stitches so that it is.
2. For the first 12 rows, I used a k2,p1 ribbing stitch.
3. After the ribbing, I knitted until the entire hat measured 6 1/2 inches from the cast on row. I have a pretty small head (I can usually wear kid's hats) so you may want to add onto this.
4. Once I reached 6 1/2 inches, I knitted 1/3 of the stitches onto a double pointed needle, then knitted another third onto a second double pointed needle, and finally knitted the last third onto a third double pointed needle.
5. For the next row I k2tog across. Depending on the number of stitches you have, you may end up with an extra stitch on the first needle - I just transferred that to the next needle and continued on. If at the end of the third needle you still have an extra stitch, just knit that.
6. The following row, knit around.
7. Repeat rows 5 and 6 until you have 7 or 8 stitches on your needles.
8. Cut the yarn, leaving a tail and thread onto a tapestry needle. Run the needle through the remaining stitches and remove the needles. Pull the tail tight and sew a couple of stitches on top of the hat to secure it. Work in the rest of the tail and the cast on tail.
Happy Creating! Deborah
Charlie fell in love with the 1996 Disney "Hunchback of Notre Dame" movie this summer, so of course she chose Esmeralda for this year's Halloween costume! I used Simplicity's 2845 for the basic pattern and made a few changes.
Everything needed to be as exact a copy as possible - but who wants to keep tucking a four-year-old's shirt into her skirt all night long? The pattern I used was a dress, so I cut it in half at the waist and made the top portion in the shirt fabric and the bottom portion in the skirt fabric. If you do this, be sure to add a 5/8 inch seam allowance on the shirt and skirt patterns where you sew them together.
Charlie wasn't thrilled with having a transparent scarf fabric - that's not what the pictures of Esmeralda looked like, so we went with a satin. The pattern has you cut a square and double it - that's a lot of satin, so I just made a triangle and hemmed the edges. Our original plan was to knot it around her waist, but that was difficult with satin, so I trimmed off enough from the edges that would've been tied so that I could sew on velcro. As you can see from the photo, I didn't quite get it trimmed evenly!
Esmeralda's turquoise belt has yellow stripes. I used yellow satin ribbon that I fused onto the belt with Steam-a-Seam II lite. I also used velcro to attach the belt, but it felt too tight to Charlie, so I added an extension (which you can see in the photo) to attach the velcro onto.
For a trick-or-treat bag, I sewed up two rectangular sacks - one in purple and one in the shirt fabric for a lining. I put the lining into the purple sack (just set in, wrong sides together), and turned down the top edge and sewed in place. Purple straps (long rectangular pieces sewn together with the ends left open and turned right side out) finished it up.
Oh - and I found the coin trim at JoAnn's! Clip on gold hoop earrings and a tambourine completed the outfit. Charlie's been practicing her gypsy dancing with her cat Moose as an audience!
Happy Creating! Deborah
I'd like to introduce you to my newest inspiration, my grandson Henry James! Over the last several months, you've probably seen some of the pieces he's already inspired me to create. There will be more!
I'll most likely be absent from the blog for a couple of weeks (except for an upcoming post inspired by my other muse, Charlie) as I spend my time adoring him and helping his mom and dad. But I'll leave you with instructions on making his little newborn hat!
Newborn Hat
This is a pattern by Bev found here that I adjusted to be a larger size. Henry was almost 8 pounds and the tiny newborn hats just didn't work well, plus I wanted something that would take him through his first few months.
Materials:
*worsted weight yarn - I used Lion Brand's Wool Ease in Wheat
*size 6 knitting needles
*tapestry needle
1. Cast on 56 stitches very loosely.
2. Work ribbing with a knit 1, purl 1 stitch for 10 rows.
3. Work in stockinette stitch until whole piece measures 4.5 inches - end with a purl row.
4. Knit two together across the next row - you'll have 28 stitches.
5. Purl the next row.
6. Knit two together across the next row - you'll have 14 stitches.
7. Purl the next row.
8. Knit two together across the next row - you'll have 7 stitches.
9. Cut off leaving a long piece of yarn. Pull the yarn through the 7 remaining stitches, remove from the knitting needle and pull tight. Thread the yarn onto a tapestry needle and sew up the seam. Weave the ends in.
Happy Creating! Deborah